
You’ve baked your gingerbread house to perfection and let it cool down and now you’re ready for the really fun part.
Or the really torturous part. It can go both ways… A bit like The Block – Gingerbread Style. Channel 9 execs, if you’re listening, I’ve got the rights and I’m willing to sell…
The first thing you’ll need is a bucketload of royal icing. This is your cement and it’s the one thing that will make or break your gingerbread house fortunes.
Royal Icing
6 egg whites
1kg icing sugar (not icing mixture. It must be pure icing sugar)
1 teaspoon Cream of Tartar (if you don’t have this you’ll be fine. It just makes the mixture extra stable, but it’s not essential)
Make sure your mixing bowl is super clean. Any trace of grease will stuff up your icing.
Whip the egg whites into stiff peaks
Add in the icing sugar and cream of tartar and keep whipping until it feels like toothpaste.

It should leave marks when you cut it with a knife like this:
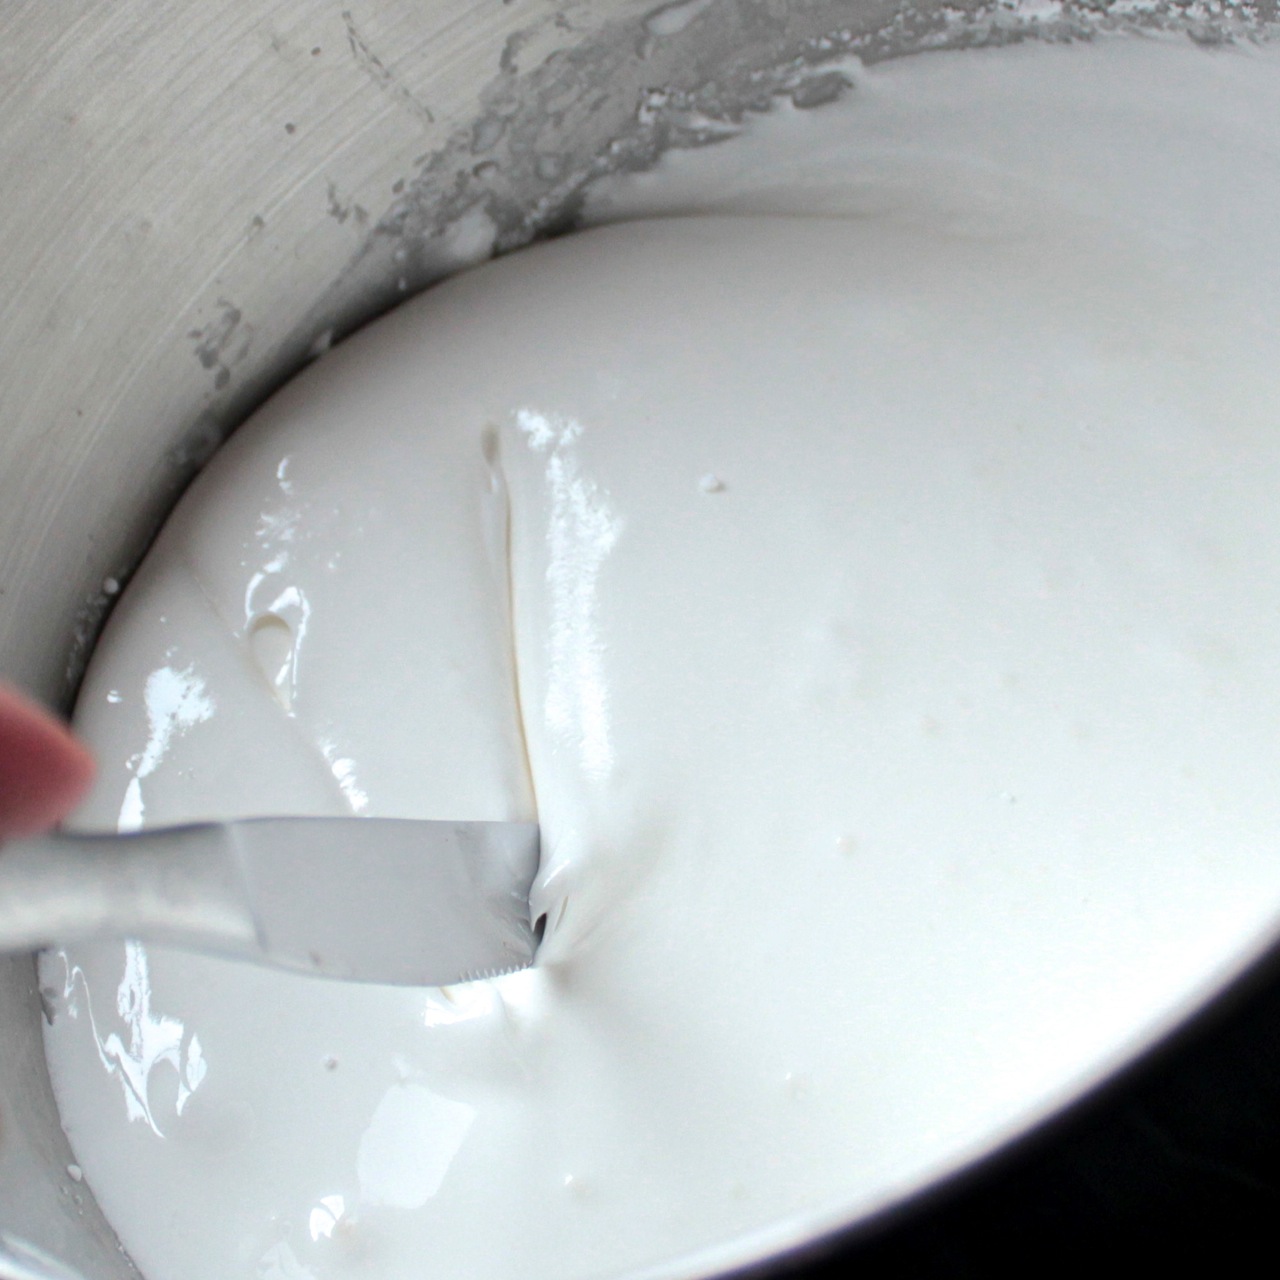
If you can count to ten before the marks start to disappear, your icing is thick enough. If not, keep adding icing sugar until it is.
You want it nice and thick so that it dries quickly and keeps all the pieces in place.
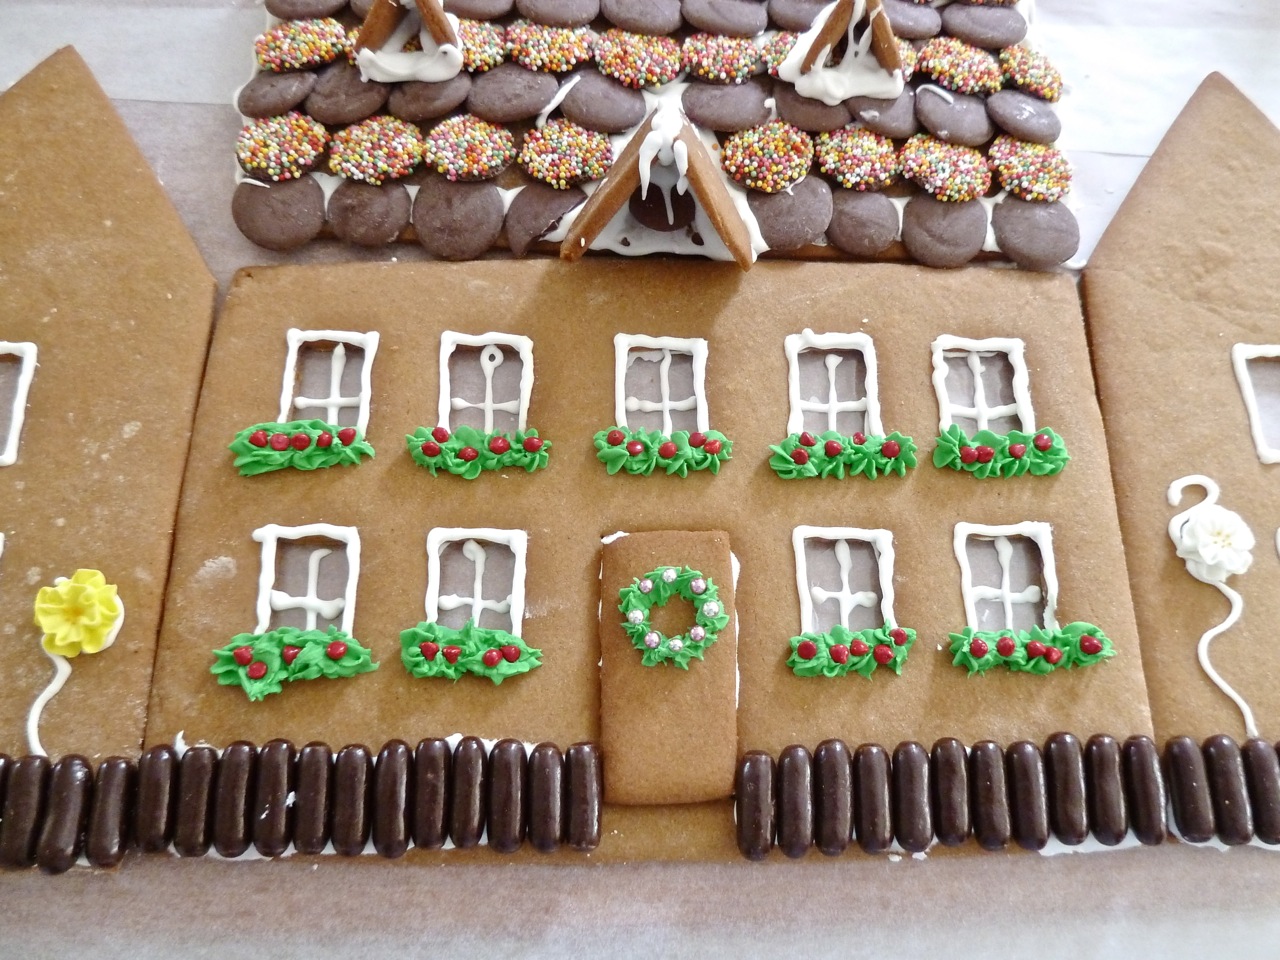
You should have all your gingerbread pieces laid out on the table and ready to decorate.
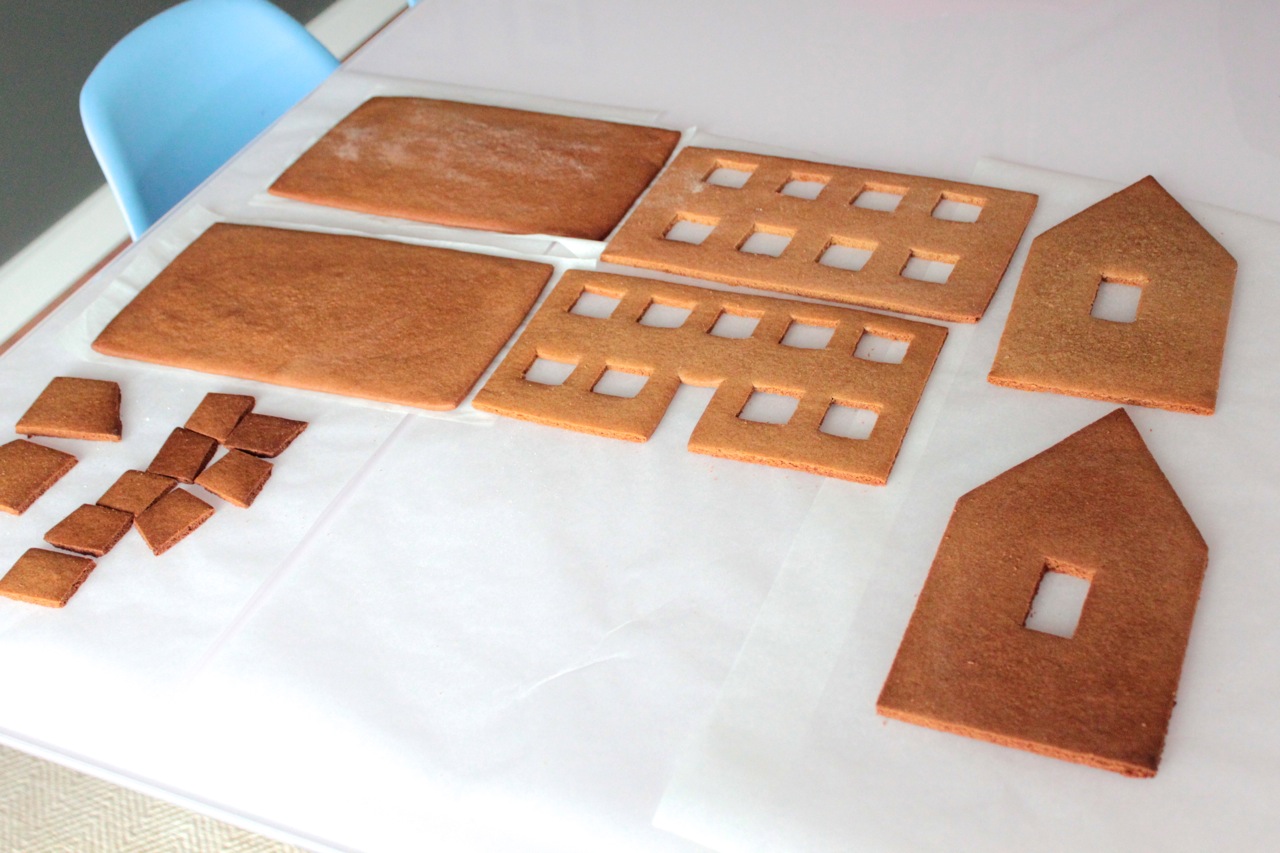
It’s MUCH easier to decorate the pieces when they’re flat on the table, so I always recommend decorating before you build your house.
Grab piping bag. I like the Multix disposable piping bags. Because messy.
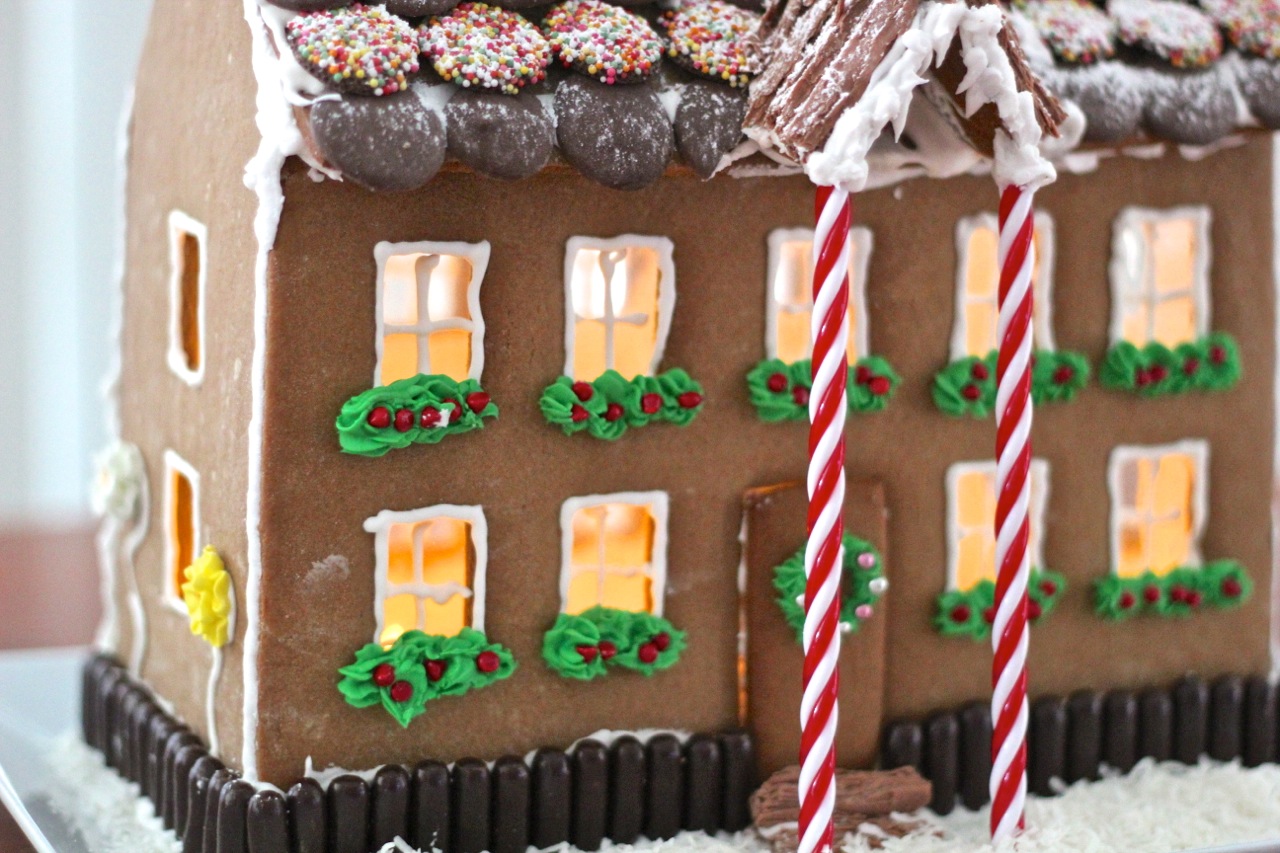
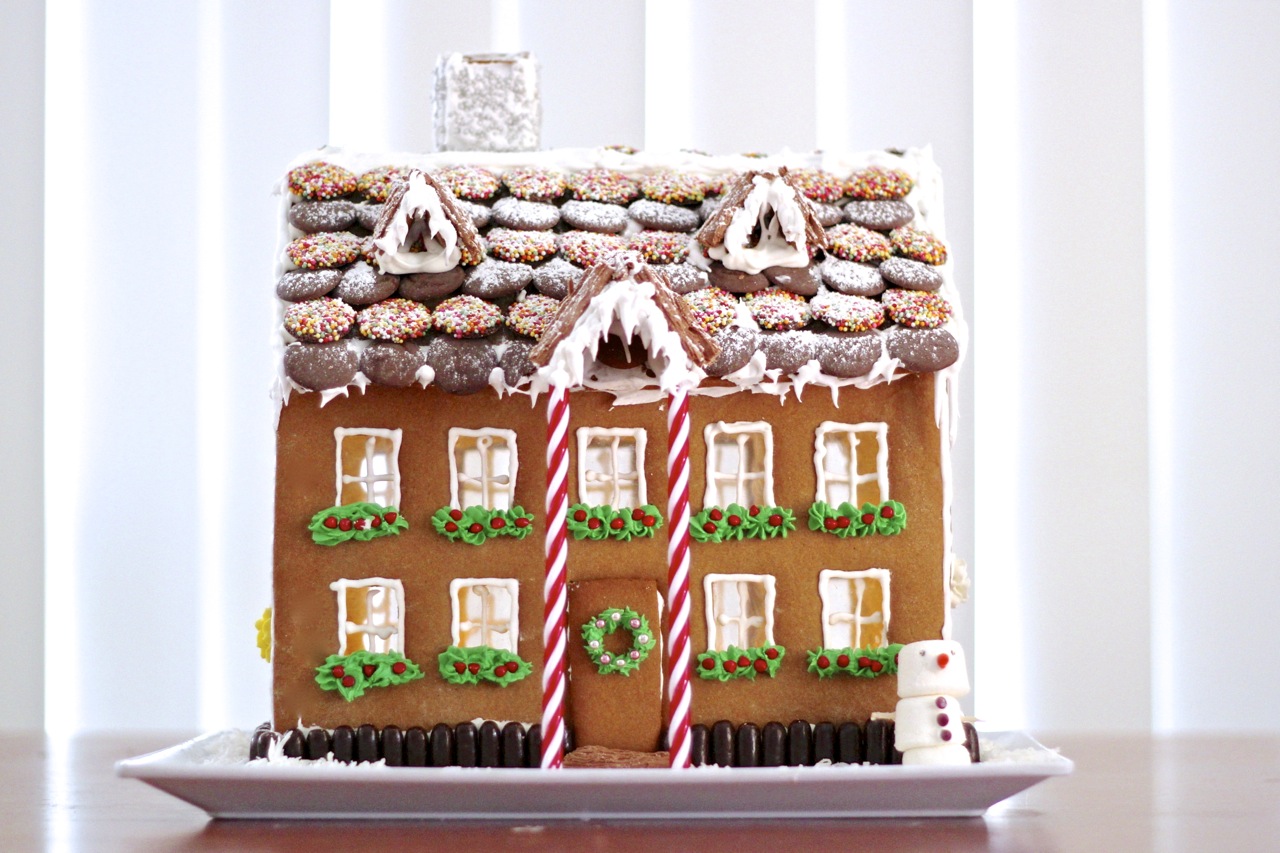
I think the most impressive part of this house is the windows. If you really want to impress the bejesus out of everyone, you can put some little electric tea lights inside the house so the light glows through the windows. EPIC.
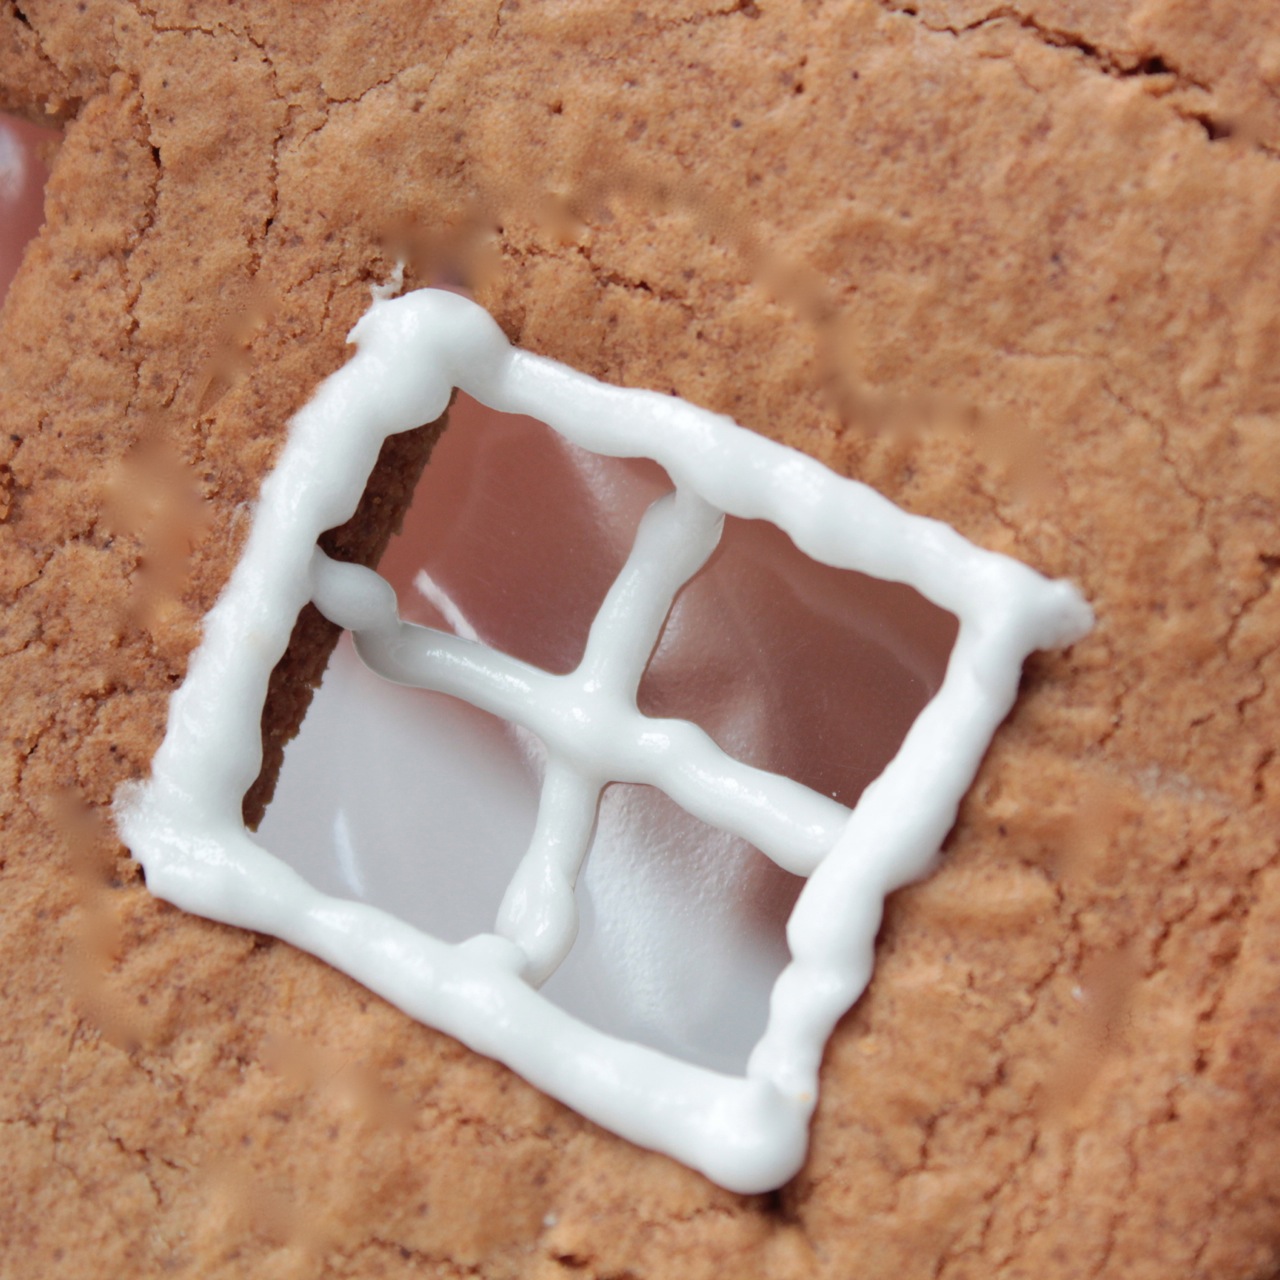
Grab some clear cellophane and cut it so that it’ll cover the windows.
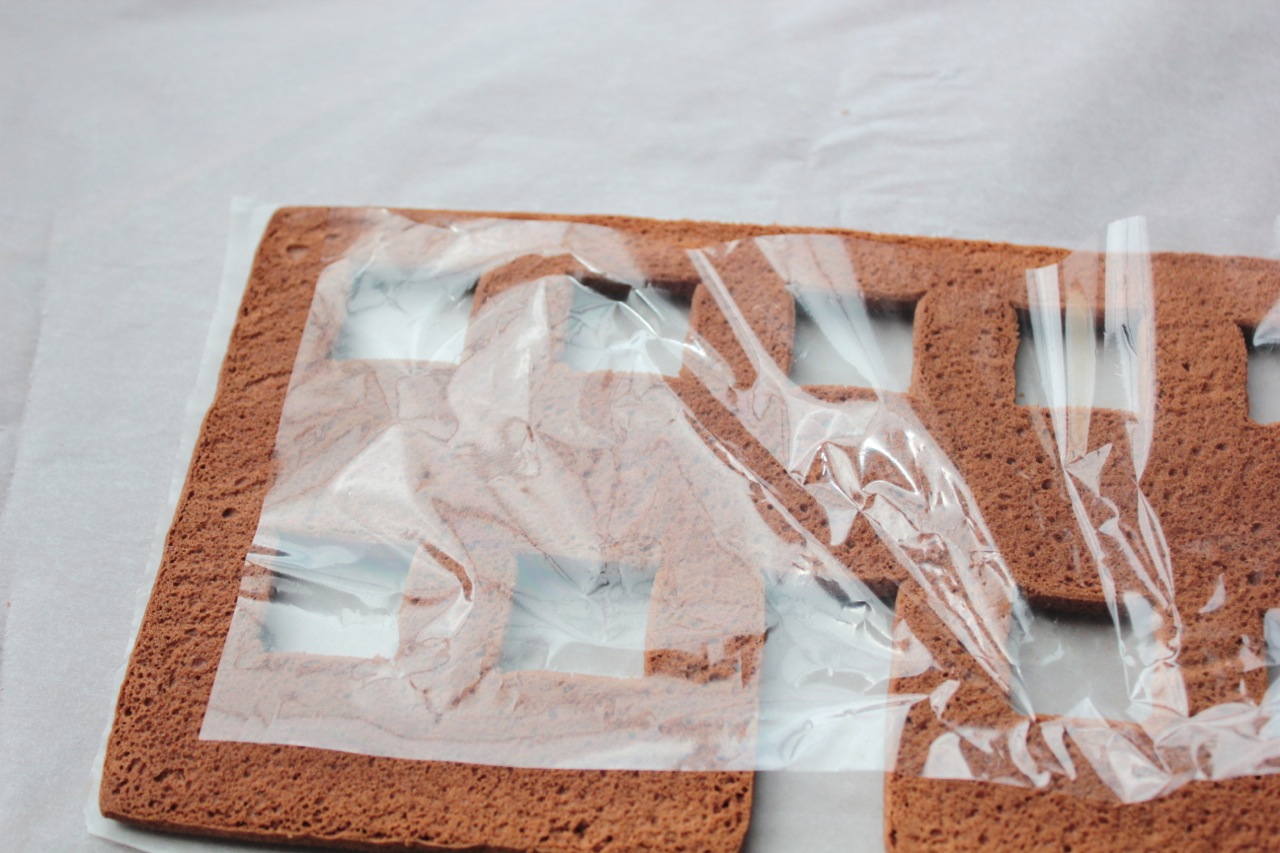
Pipe some royal icing around the windows like glue and lay the cellophane on top. Press it down and let it dry a bit before turning the piece over.
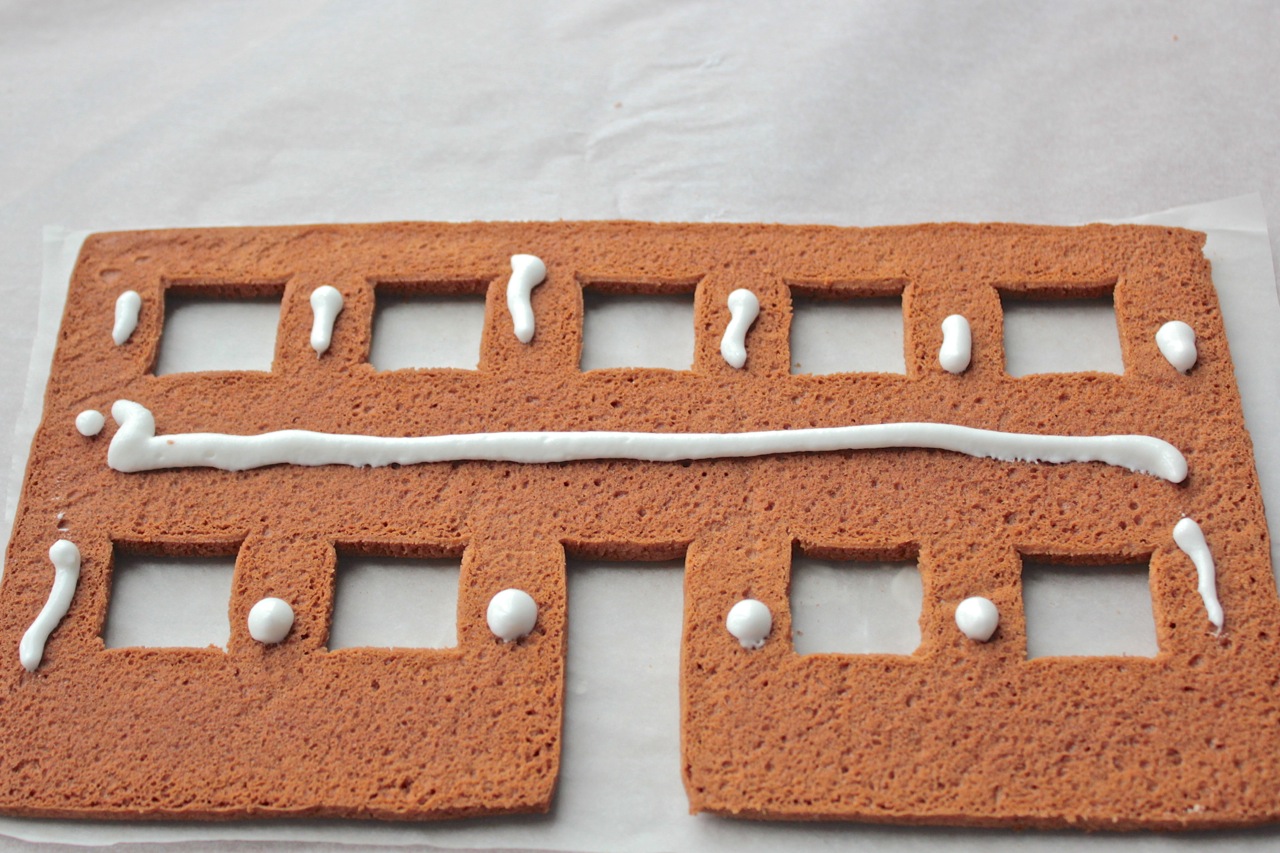

Once it’s ready, put a fine tip on your piping bag and pipe the cross of the window, followed by the outline.
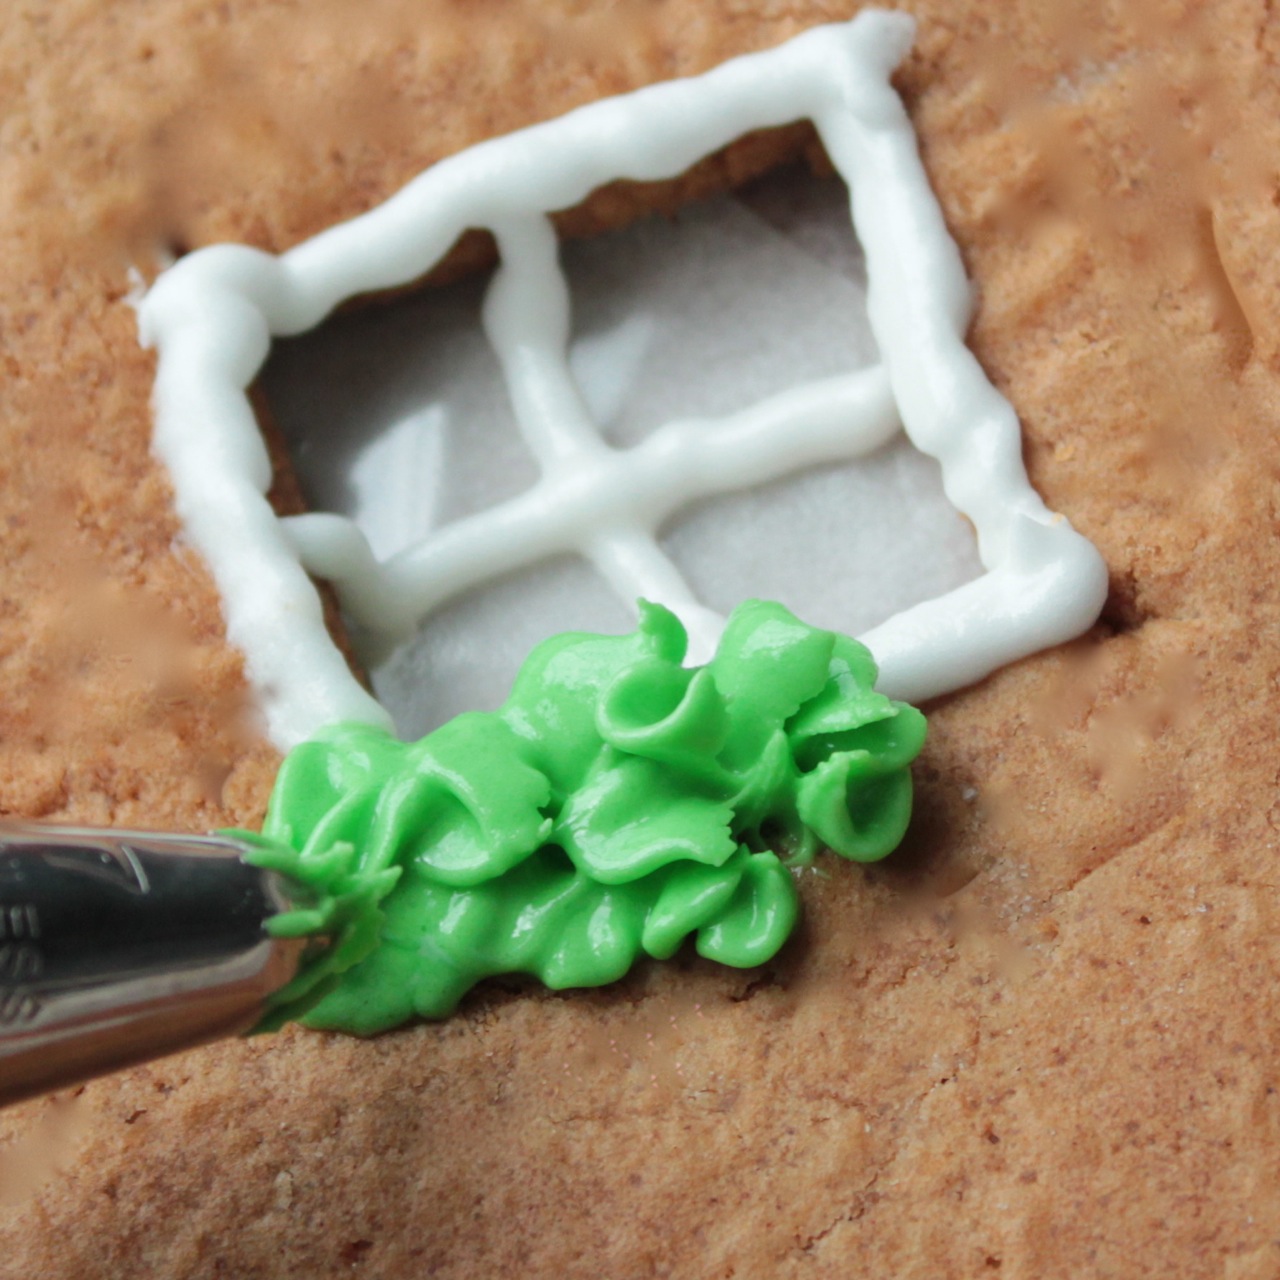
Don’t worry if it gets a bit messy, because you can cover a lot of it up with some greenery.
Get a small bowl and mix in some green food dye. This will thin out the icing, so you’ll need to add a bit more icing sugar to make sure it sets.
Use a star shaped piping tip to make the little hedges look leafy. Then pop on some little cachous or choc bits to make the flowers.
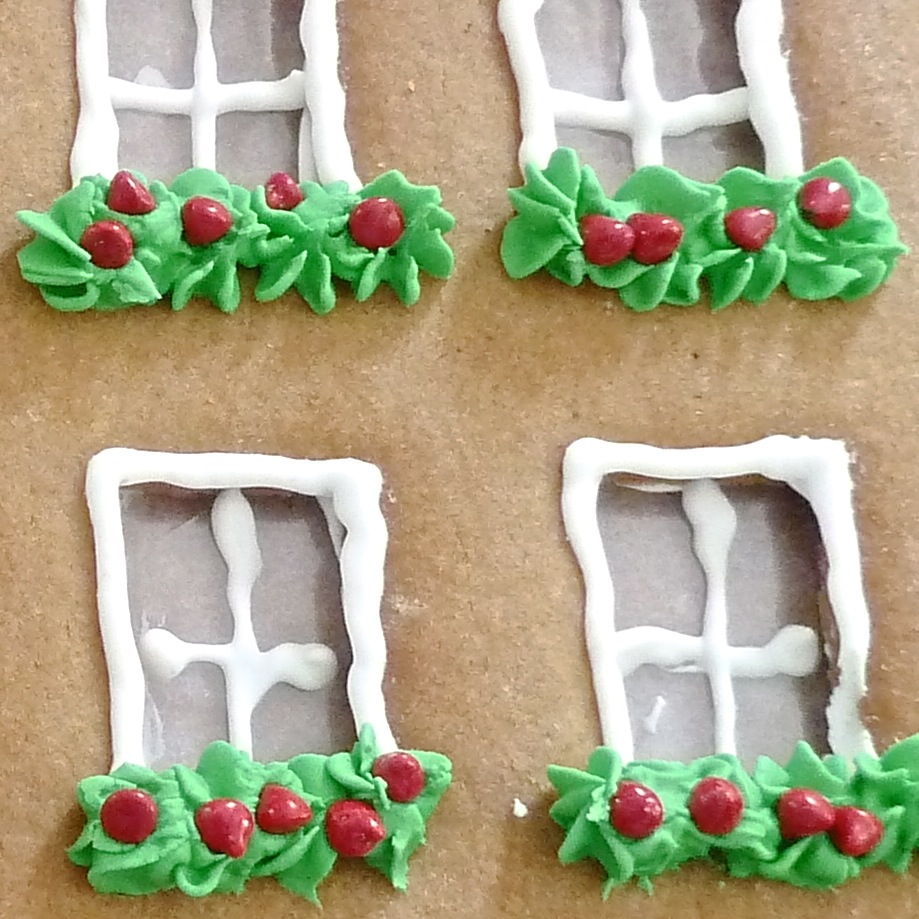
I don’t bother doing the greenery on the back windows. I just make some little royal icing icicles.

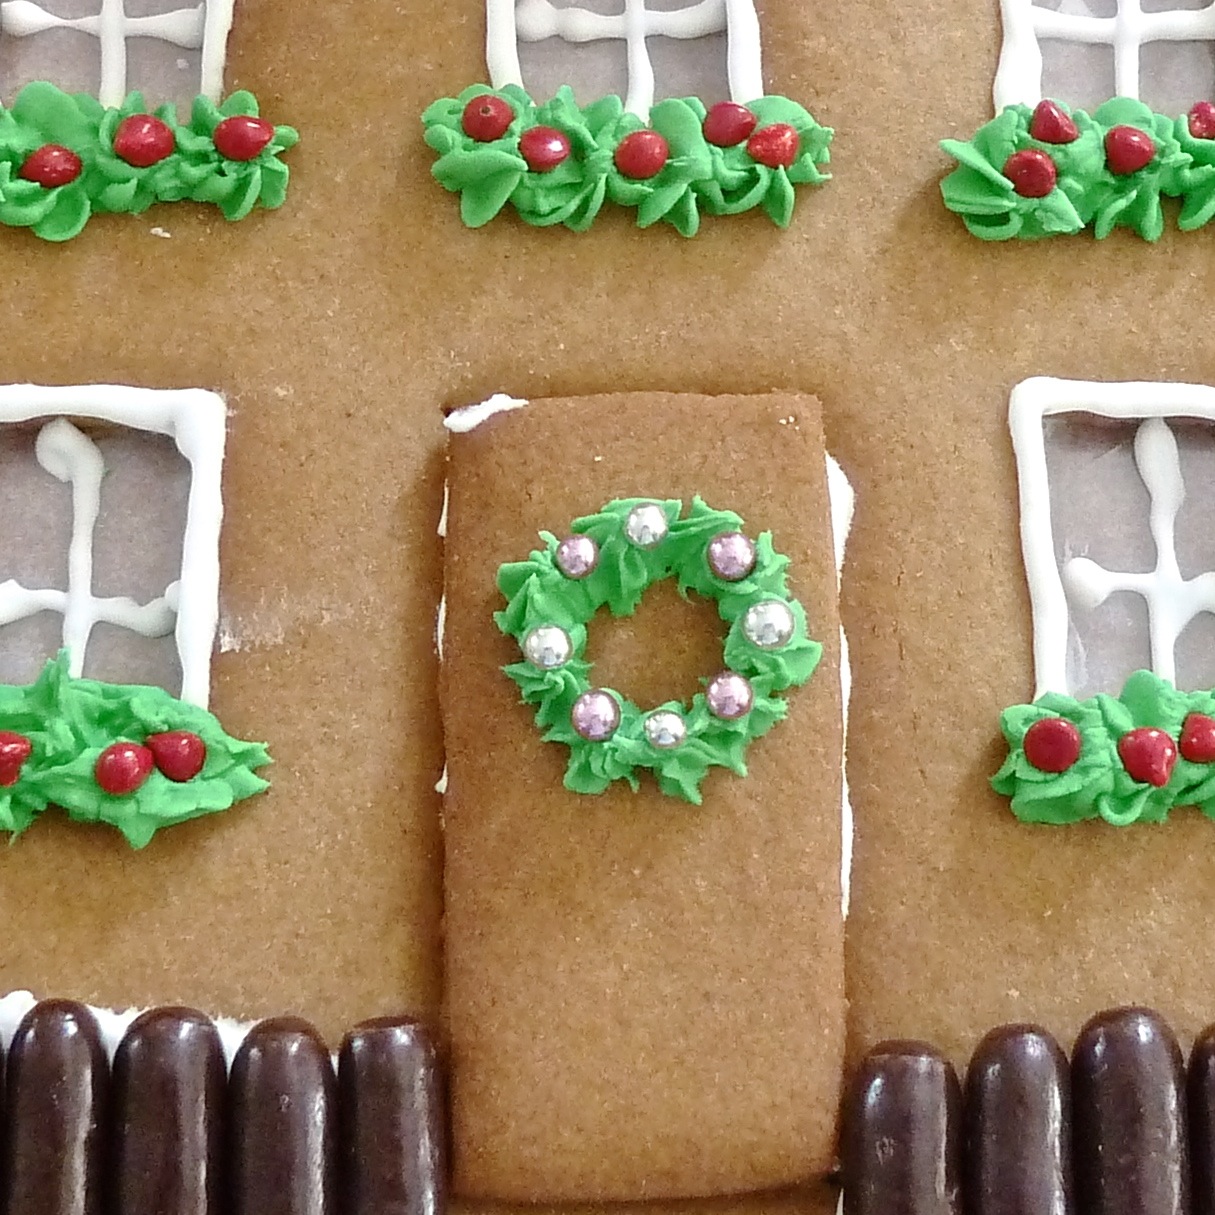
Attach the door to the front of the house and add a little green wreath.
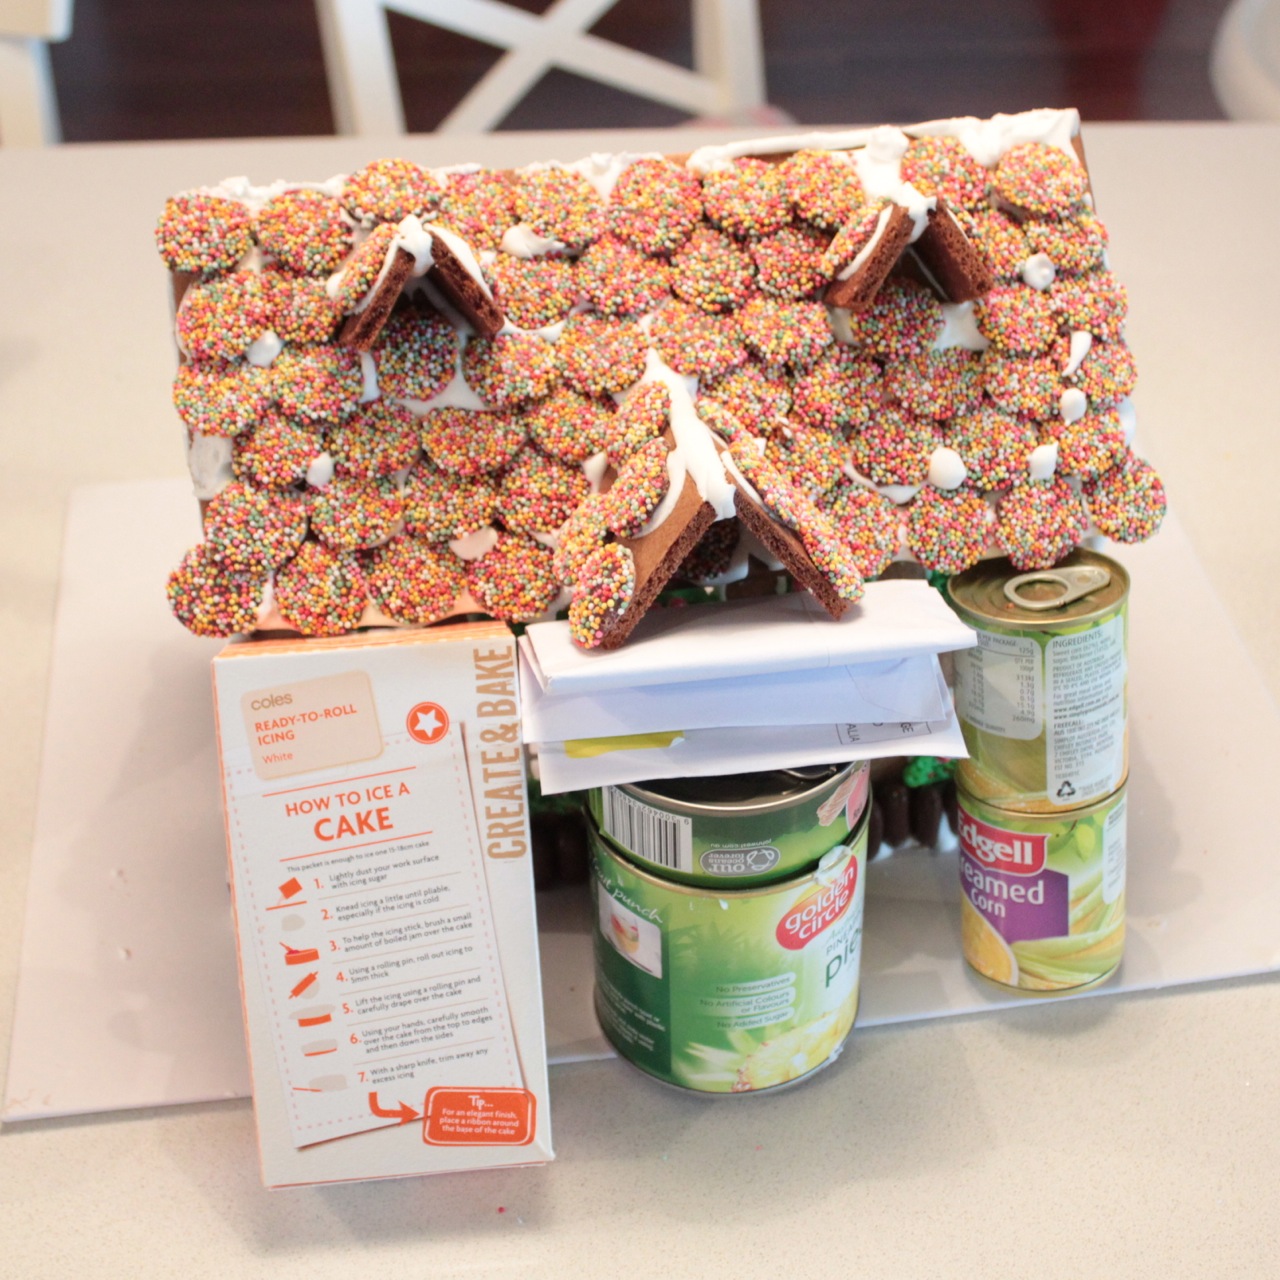
You can tackle the roof next.
Use the royal icing to assemble and attach the chimney, the awning and the roof windows.
I’ve used freckles and choc drops to make shingles/ roof tiles. You could also use shards of a Flake bar to make it look like a thatched roof. You could also use Smarties or boiled lollies or any sort of sweet to make the roof look gorgeous.
Use big fat dollops of royal icing to attach the lollies to the roof. If you’re going for the shingle style roof, start at the bottom and work up so each row overlaps the last a little bit.
It doesn’t need to look perfect. Some royal icing ‘icicles’ and some icing sugar ‘snow’ will hide lots of messiness.
Decorate the sides and back with lollies and icing swirls or whatever your heart desires. I’ve used some choc bullets as a picket fence around the base.
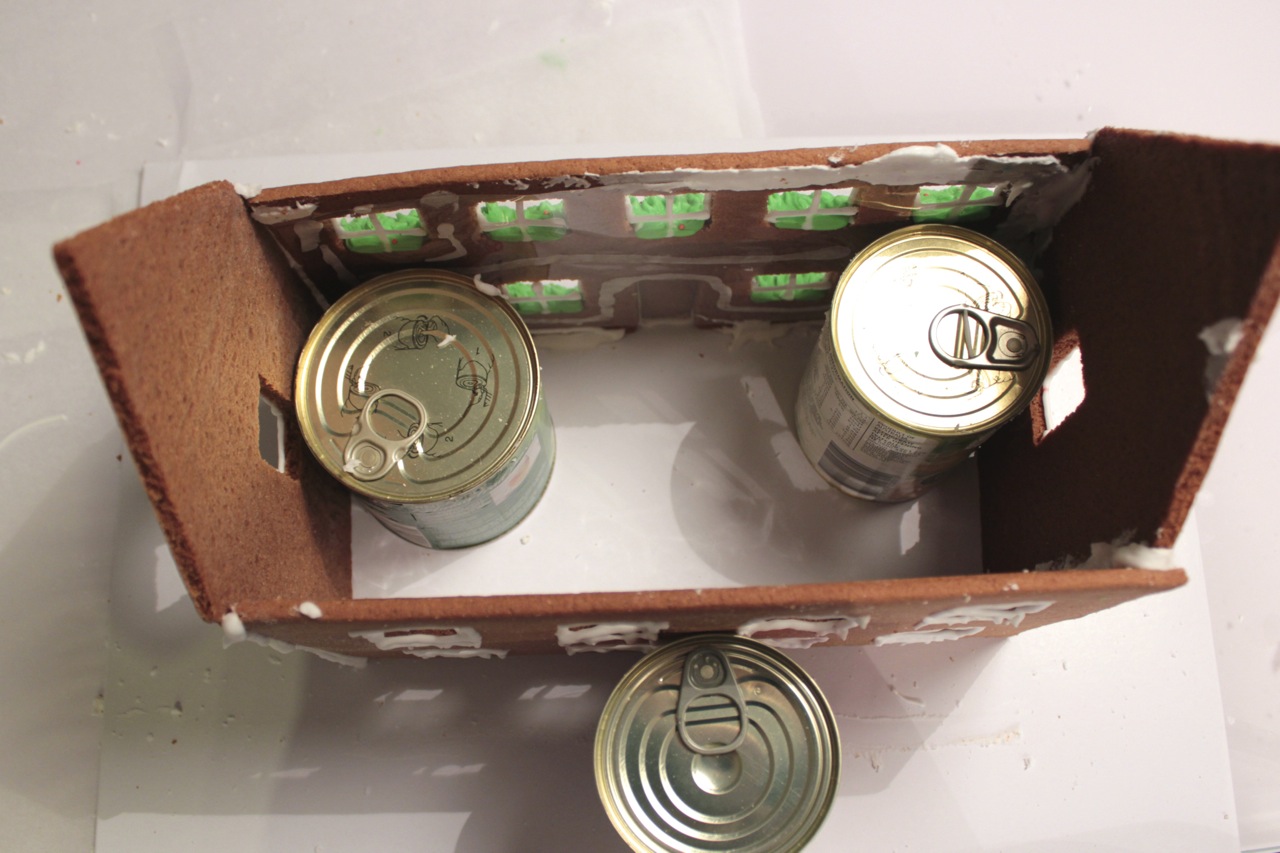
When it’s all set and ready, you can start construction.
You’ll want a cake board or chopping board or something quite sturdy to use as a base.
If you do want to use some tea lights to light up the house, don’t attach the house to the base. You’ll need it free so you can lift up the whole house to turn the lights on and off. This will make the house a bit more fragile, so be careful.
This is the scariest part. Especially if you’ve worked really hard on the decorations. If you slip and break a piece, you’ll want to stab someone. Seriously, it’s like being punched in the stomach. It’s never a bad idea to have spare parts for your house. You might have some left over dough after baking all the pieces, so I recommend making a spare front and back of the house. Maybe a piece of roof too. It could save a lot of heartache. And if you don’t have to use it, well, SNACK TIME!
I use cans of food to prop the pieces up. A second pair of hands will also come in handy (see what I did there? Hand!? Seriously, I’m a very funny person.)
Using a fat nozzle on your piping bag, pipe a line of icing to join the front and sides. Start off with a fairly thin layer. As this starts to harden and bond the pieces together, add another fat layer over the top. The icing should dry fairly quickly. If it’s just sliding off and forming a puddle at the bottom of your house, it’s too thin. Add some more icing sugar to thicken it up. If it’s too thick and won’t come out of the piping bag, or won’t stick to the gingerbread pieces, add a TINY amount of water to the mix. I really mean it when I say tiny. Add about 5mls or even less and see how you go. You can always add more water but if you add too much, you’ll need to keep adding icing sugar to thicken it up again and then you’re stuck in an endless cycle until you have 4 kilos of royal icing that you don’t need.
Adding the roof can be scary. Use whatever means necessary to prop it up while it dries.
If you pipe some extra icing along the edges of the awning and roof windows, you can make it look like snow and icicles. It also hides a multitude of sins.
Dust the top of the house with icing sugar to make it look like snow.
You’re going to need something to prop up the front awning of the house. I found some plastic candy canes at a $2 shop and cut off the curly top. You could also use some striped paper straws. They don’t have to be too strong. The awning should stay up without any support so they won’t be load bearing. Use some royal icing to hold them in place.
That’s pretty much it!!
I heaped some desiccated coconut around the base to look like snow.
I made a marshmallow snowman using a couple of toothpicks and some coloured choc bits stuck on with royal icing.
Honestly, it’s pretty impressive. if I say so myself.
So go on, give it a try!
It sounds epic, and it kind of is, but I promise…. if you can bake a cookie, you can make this house. It’s honestly not as hard as it looks.
Do you think you’ll give it a go?

If you liked this, make sure you like The Thud on Facebook so you never miss a post!
8 comments
I saw this and had to give it a try. I’m very pleased with results, if I do say so myself! I was hoping to leave a picture, but I can’t figure out how to do it.
Got mine together! Now decorating and adding character, or characters to it.
[…] making my Gingerbread house, I had some dough left over. That stuff wasn’t going to waste. So, naturally, I made some […]
You are seriously impressive lady!!
That puts my little gingerbread house to shame.
I’m never doing this. Like, ever. It’s very pretty, but no.
Oh not a freaking chance of me trying this!! That is one hell of a gingerbread house. My favourite part is the wreath on the door. I will just watch from afar rather then try and fail.
WHOA. I am SO NOT attempting that. But it looks amazing!!!! 🙂
[…] When you have recovered from the baking, you’re ready to decorate and construct your gingerbread mansion! I’ve got all the instructions here. […]