
If, like me, the thought of going to the park fills you with a quiet dread because you know you’ll be sitting on a damp wall listening to 40 children simultaneously screech “MUM LOOK AT MEEEE”, then you’ll do anything to avoid it, including creating a mini park in your own backyard where you can sit and drink tea and watch your kids play.
I mean, kids love the park and it eats up an hour or two of your day which is, quite frankly, my primary goal when I wave goodbye to my husband in the morning (the days are long but the years are short etc etc etc) but getting in the car does my head in and I invariably attract a lone woman who may or may not have a child playing in the park but definitely does need to share horribly intimate details of her life with me and only me, no matter how desperately I try to make eye contact with the other mums who refuse to rescue me #iwillremember #youwillpay
But I’m not a monster. My kids are allowed to play. I’d just prefer to not have to put on non-elasticised pants if at all possible, so I had to come up with my own play equipment.
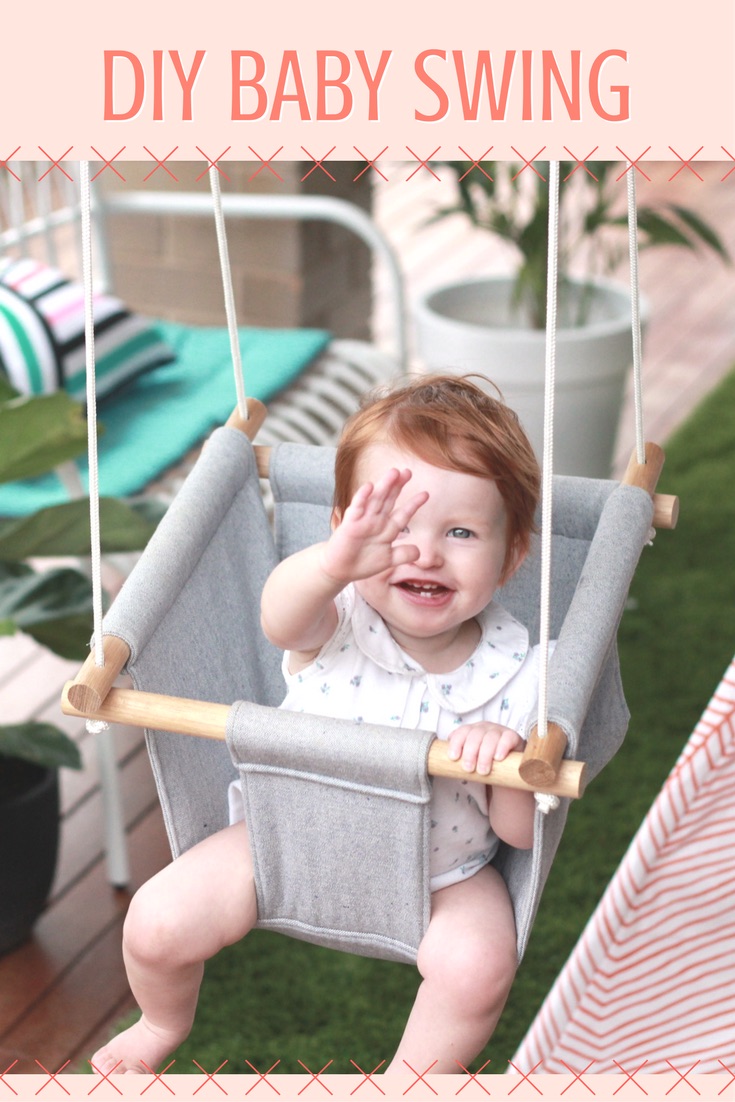
Enter the baby swing.
It’s cute, it’s functional and best of all, it confines your child to one spot for an extended period of time. Kidding! (not kidding).
There are a few tutorials out there but I’ve refined the design a bit and because I’m not an expert, I’ve tried to make the instructions idiot proof because I came across a few hurdles…
Pin this baby. PIN. IT
You’re going to need:
- Fabric – get about 2 metres of sturdy drill, denim or upholstery fabric. It’s going to need to withstand a lot of swinging.
- Batting – about 1 metre of lightweight batting which will pad out the fabric and make it all a bit firmer.
- Rope – you’ll need about 5 metres of rope depending on how low you’d like the swing to hang. I’ve used Grunt brand 6mm white braided marine rope which has a breaking strength of 650kg – so probably should survive most toddlers. Just.
- Dowel rod – 1.6m length of 19mm oak dowel will work perfectly.
- Two steel carabiners – I used these. Make sure you get ones that’ll hold the weight of your child and then some. I think ours hold up to 200kg.
- Two steel hooks (eye screws) to hang the swing from the ceiling. Again, go as heavy duty as you can. Watching your child fly across the backyard when the hardware fails isn’t as entertaining as it sounds.
- Two thick zip ties to secure the rope in place
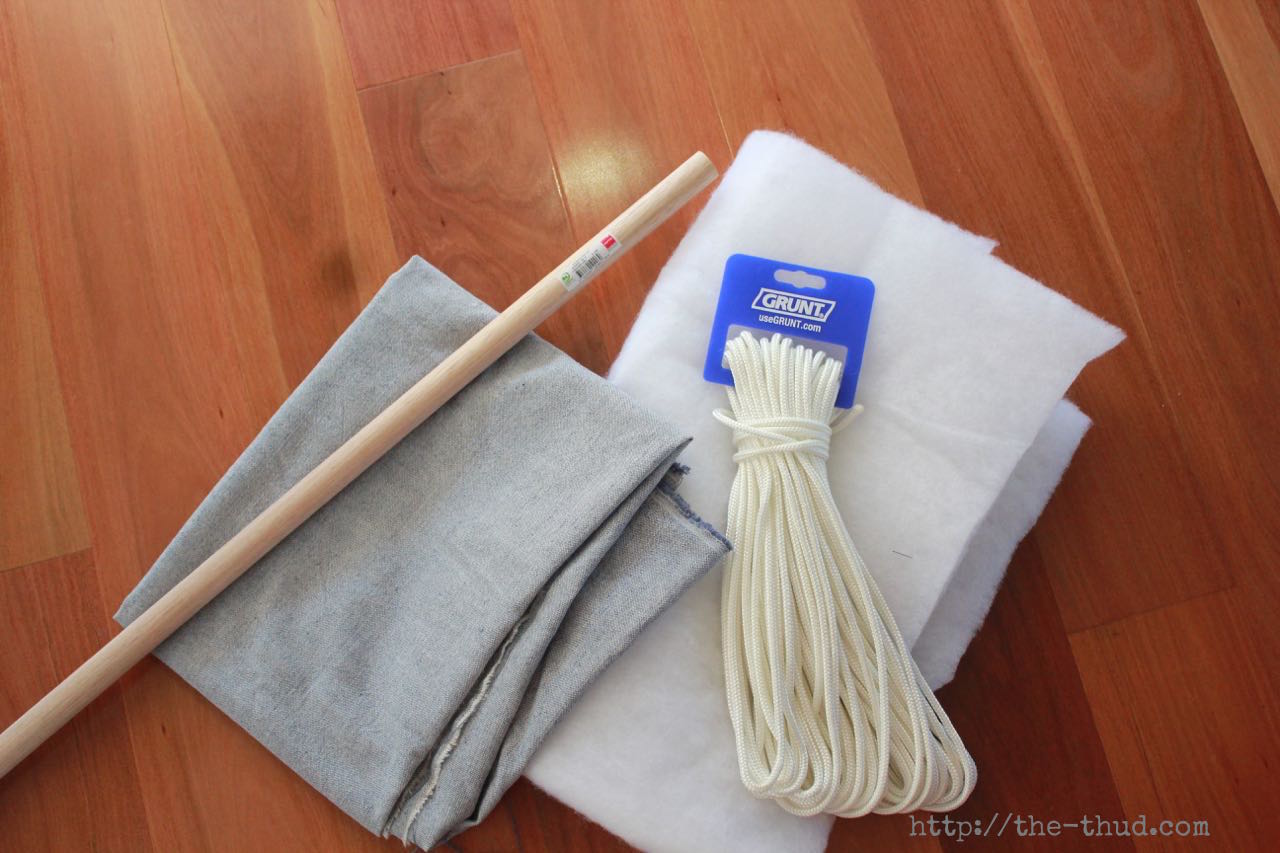
You’re also going to need (and know how to use):
- A sewing machine
- A drill
- A circular saw
Let’s go! Get cutting.
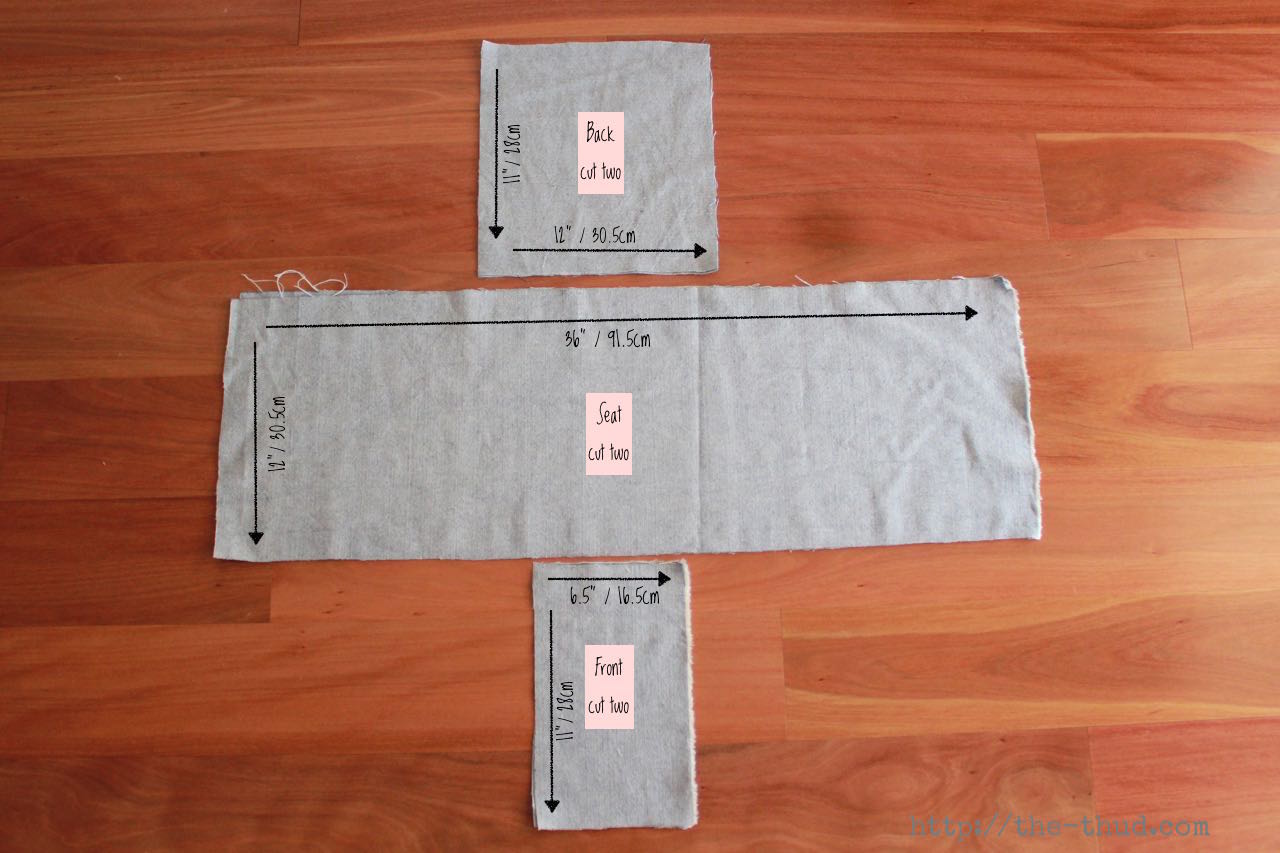
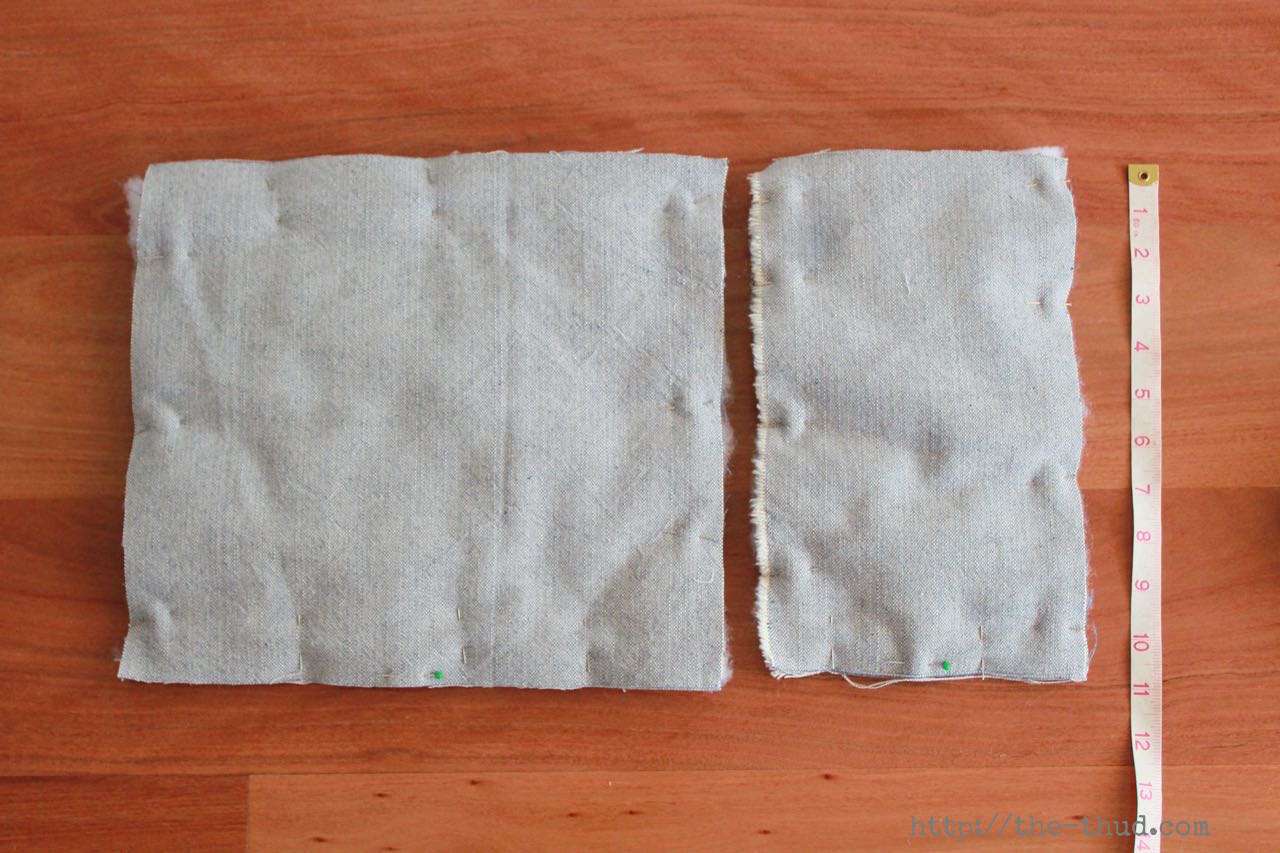
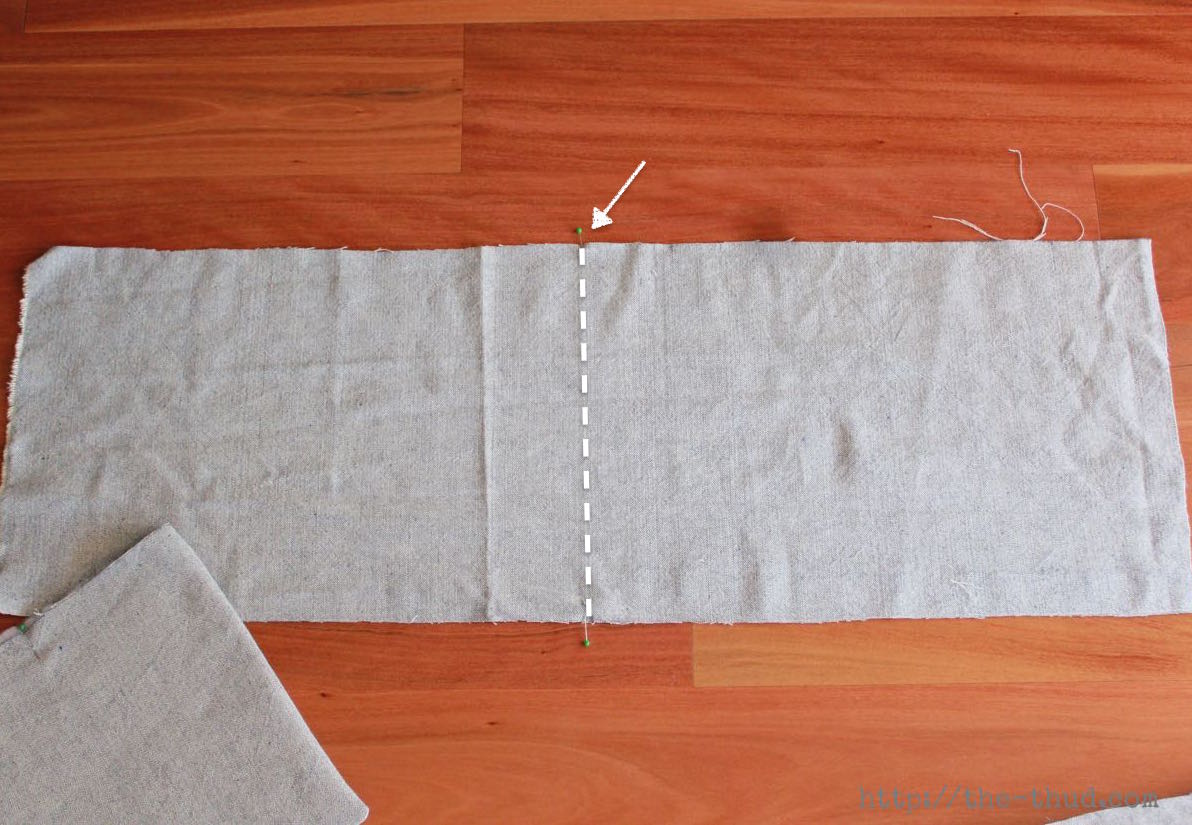
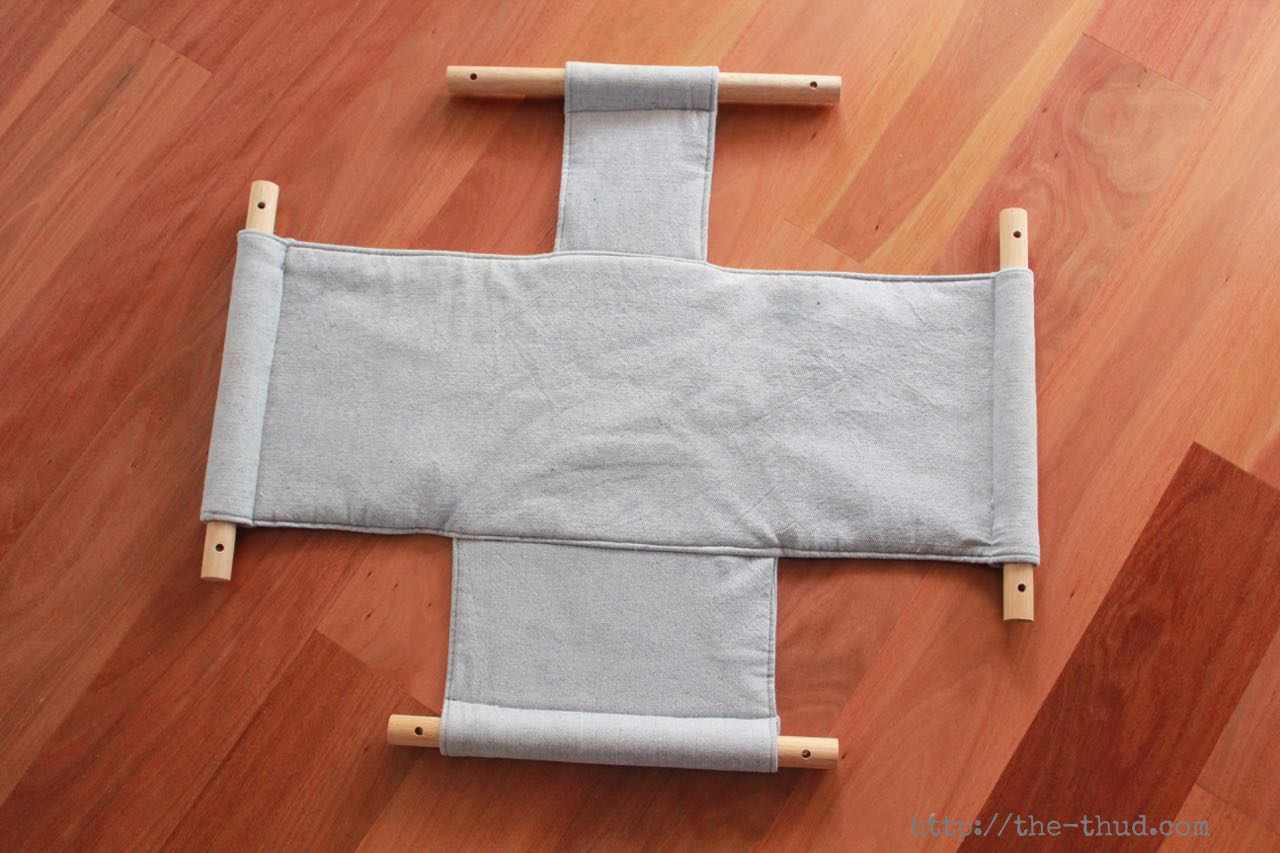
Cut two pieces measuring 28cm x 30.5cm (11×12 inches). These will form the back rest.
Cut two pieces measuring 30.5cm x 91.5cm (12×36 inches). This will be the seat which will wrap under the baby’s bum in a U shape from armpit to armpit. Get me?
Cut two pieces measuring 28cm x 16.5cm (11×6.5 inches). This will be the front section which will go up between their legs.
Cut one piece of batting for each section of the seat. Same measurements. If you don’t have a lot of batting you could just cut out the one piece for the seat (30.5cm x 91.5cm). It’ll give the seat extra strength, stability and a bit of comfort. You don’t have to have batting for the back rest and front section but it will look better.
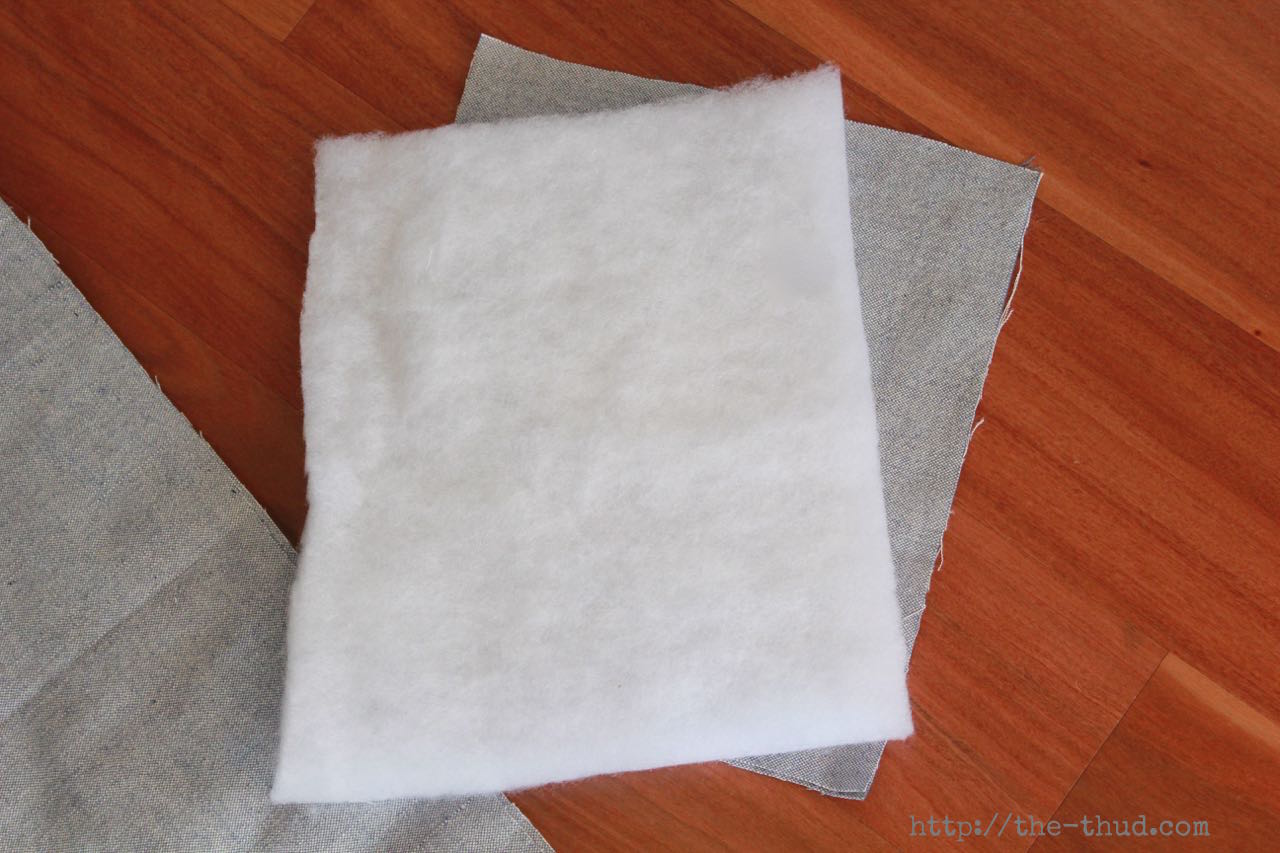
Pin the batting to the back rest and front section fabric. Leave the larger seat section for the moment.
You’re going to want to put the two pieces of fabric – right sides together – on top of each other and then the batting. So from top to bottom you’ve got fabric, fabric, batting. Got it? God, don’t you hate written instructions on the internet? Just be in my brain so you can see what I mean, ok?
![]()
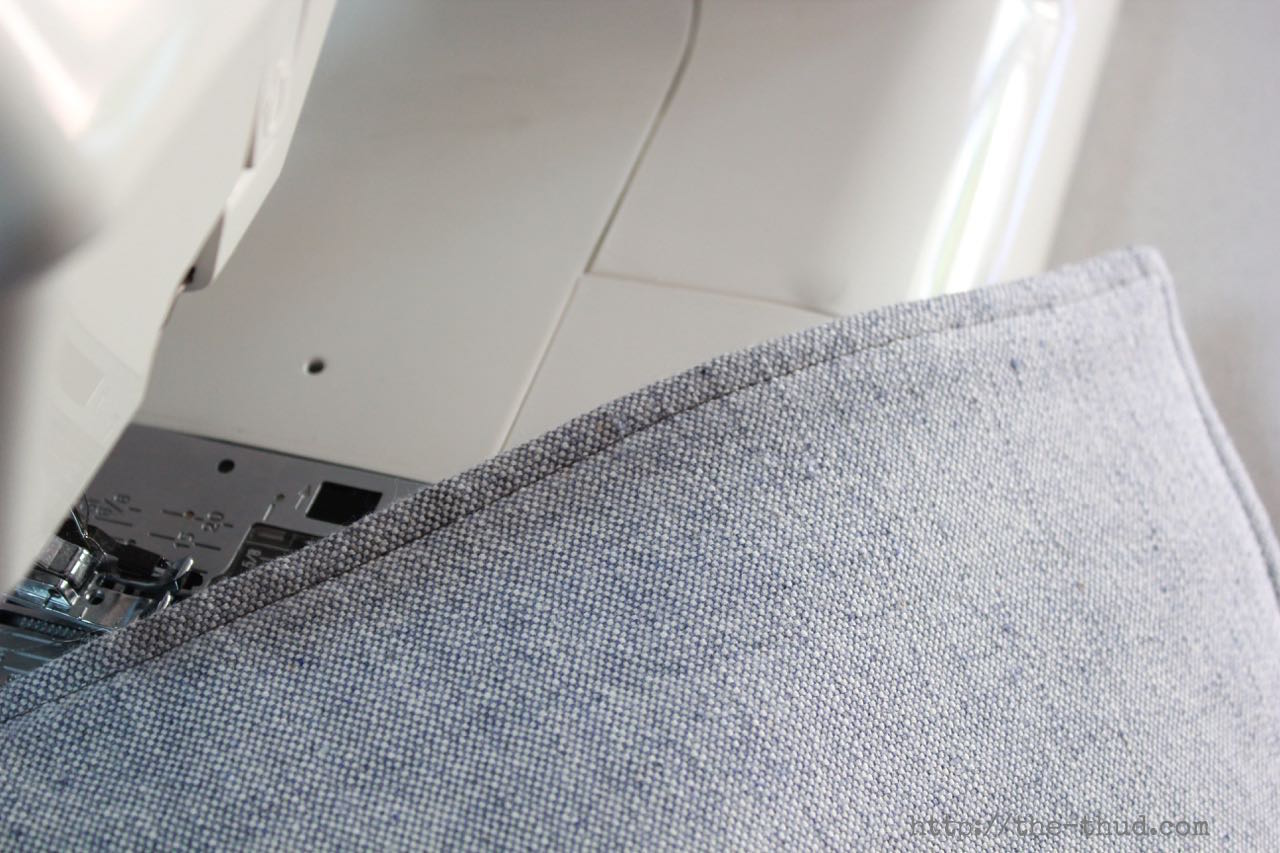
Sew right around three of the four edges on both pieces. You’re leaving that one edge open so you can turn it right side out.
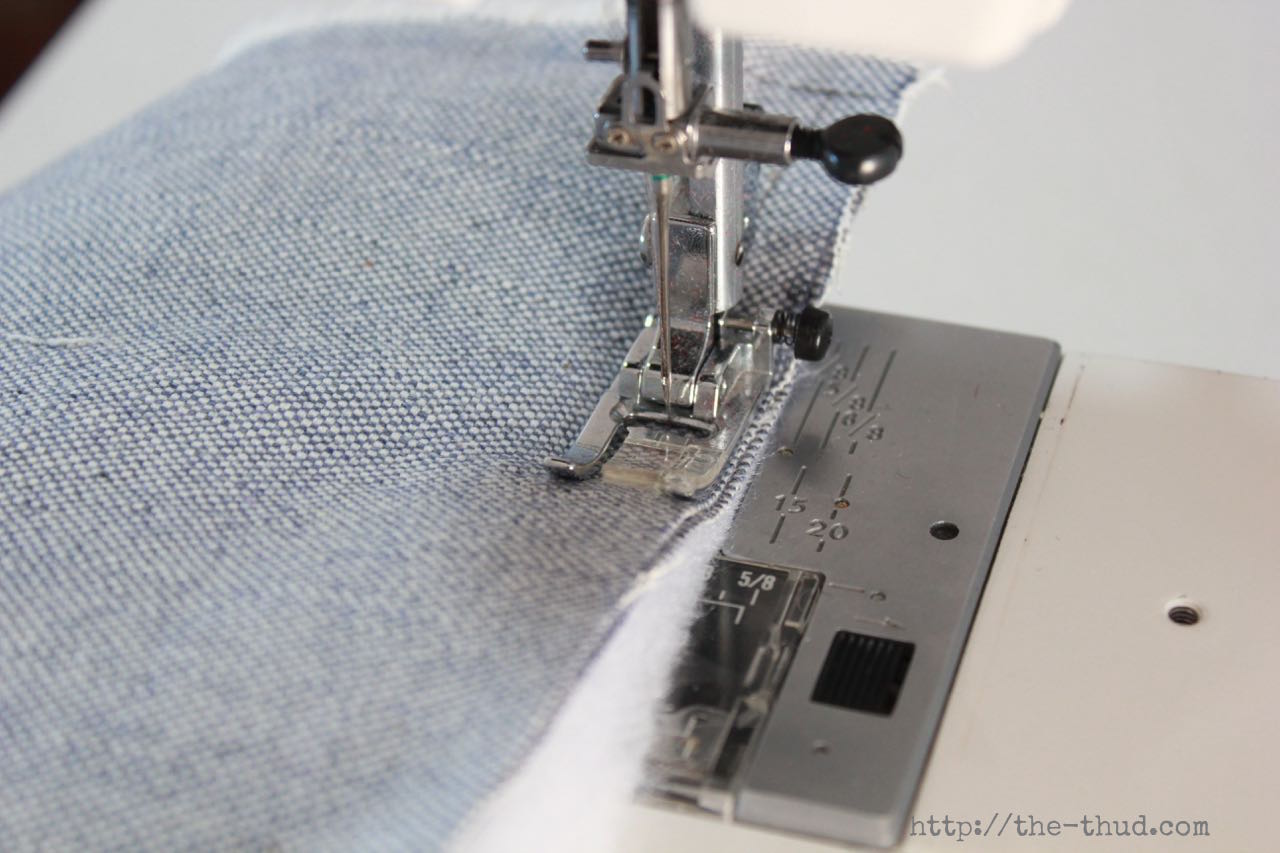
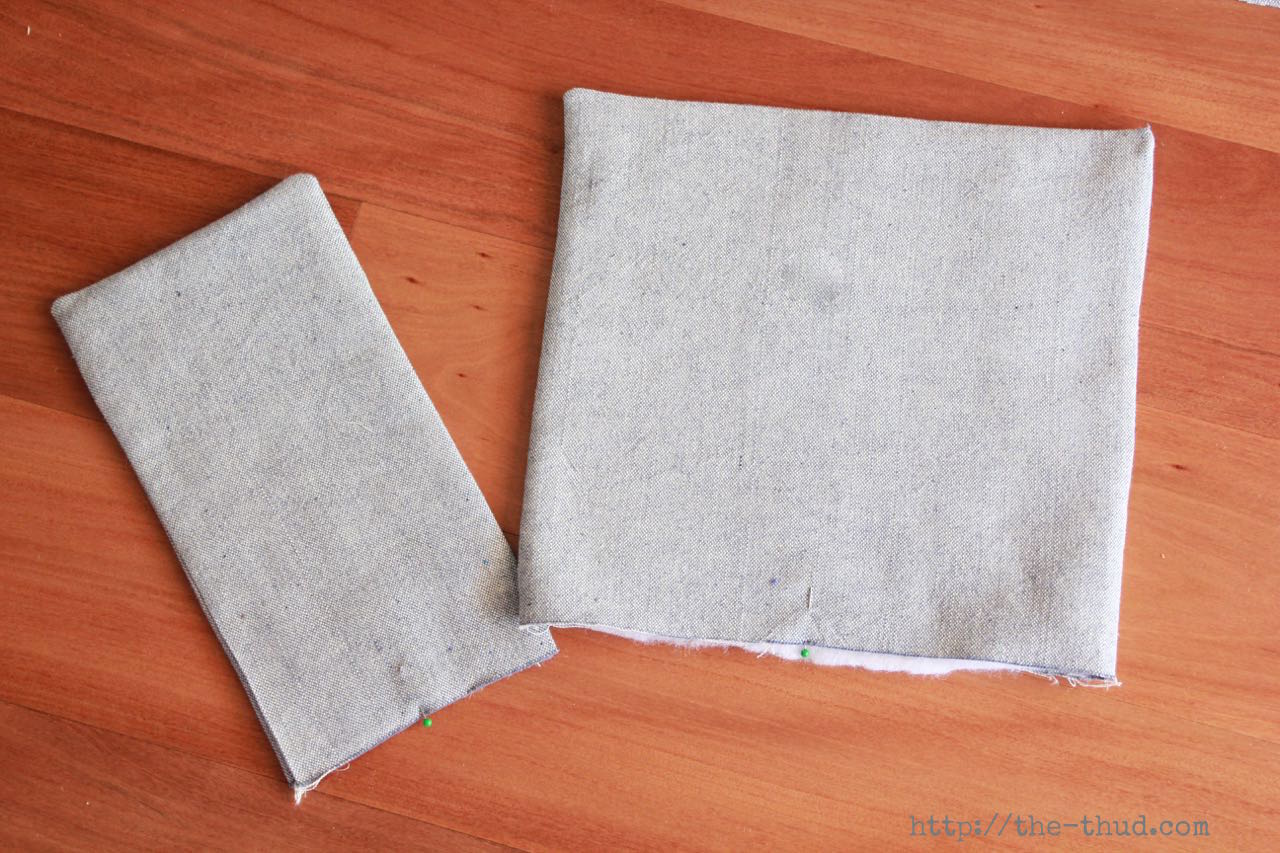
Trim the corners so they’re less bulky when you turn inside out.
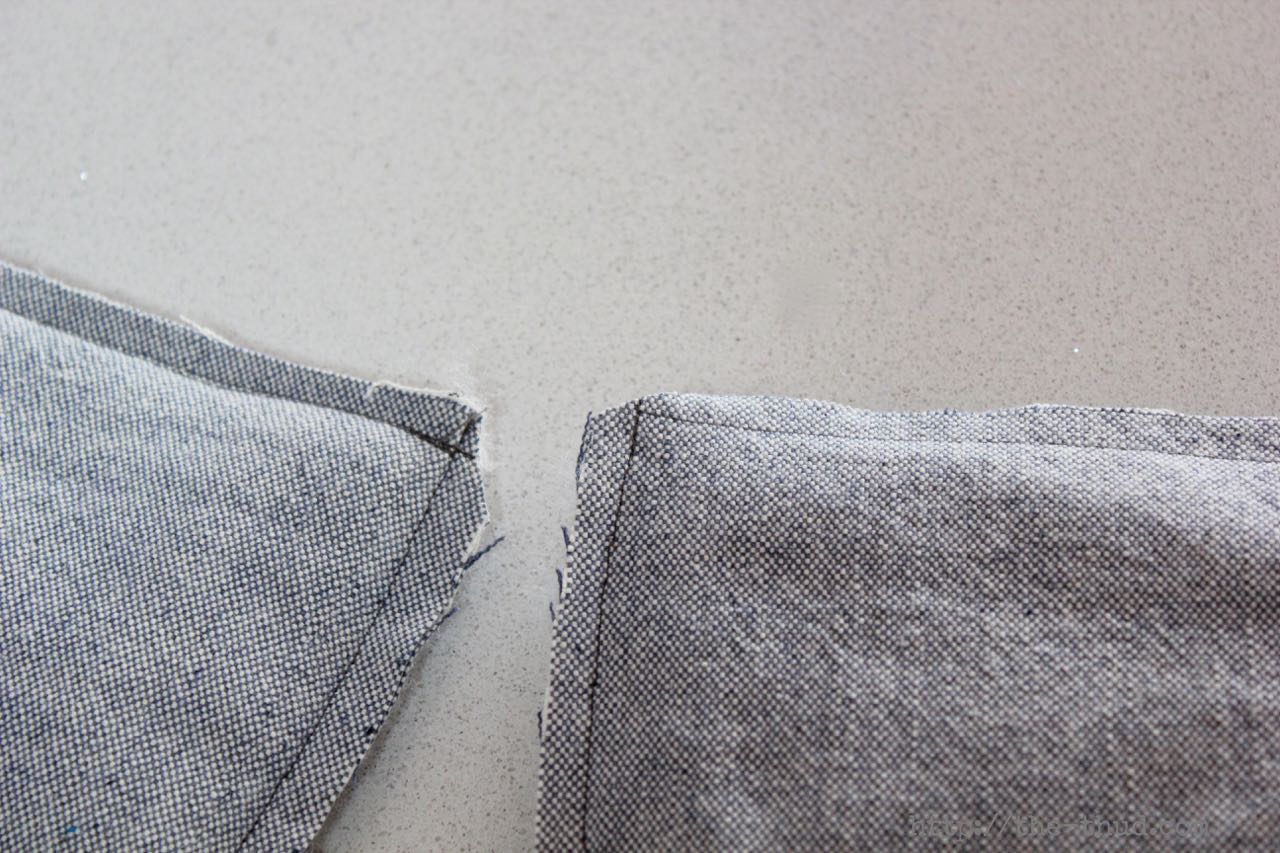
Turn the pieces inside out. Well actually, you are turning them right side in. Wait, does that make sense? Maybe it’s right side out?
Anyway, turn the batting into the inside of the fabric, use a pencil to push those corners out properly and iron the seams flat. You don’t need to sew the open edge.
![]() Take one layer of your seat section and lay flat on the ground. Measure and mark the very centre of the piece with a pin.
Take one layer of your seat section and lay flat on the ground. Measure and mark the very centre of the piece with a pin.
Pin the back section so it sits directly over the centre point.
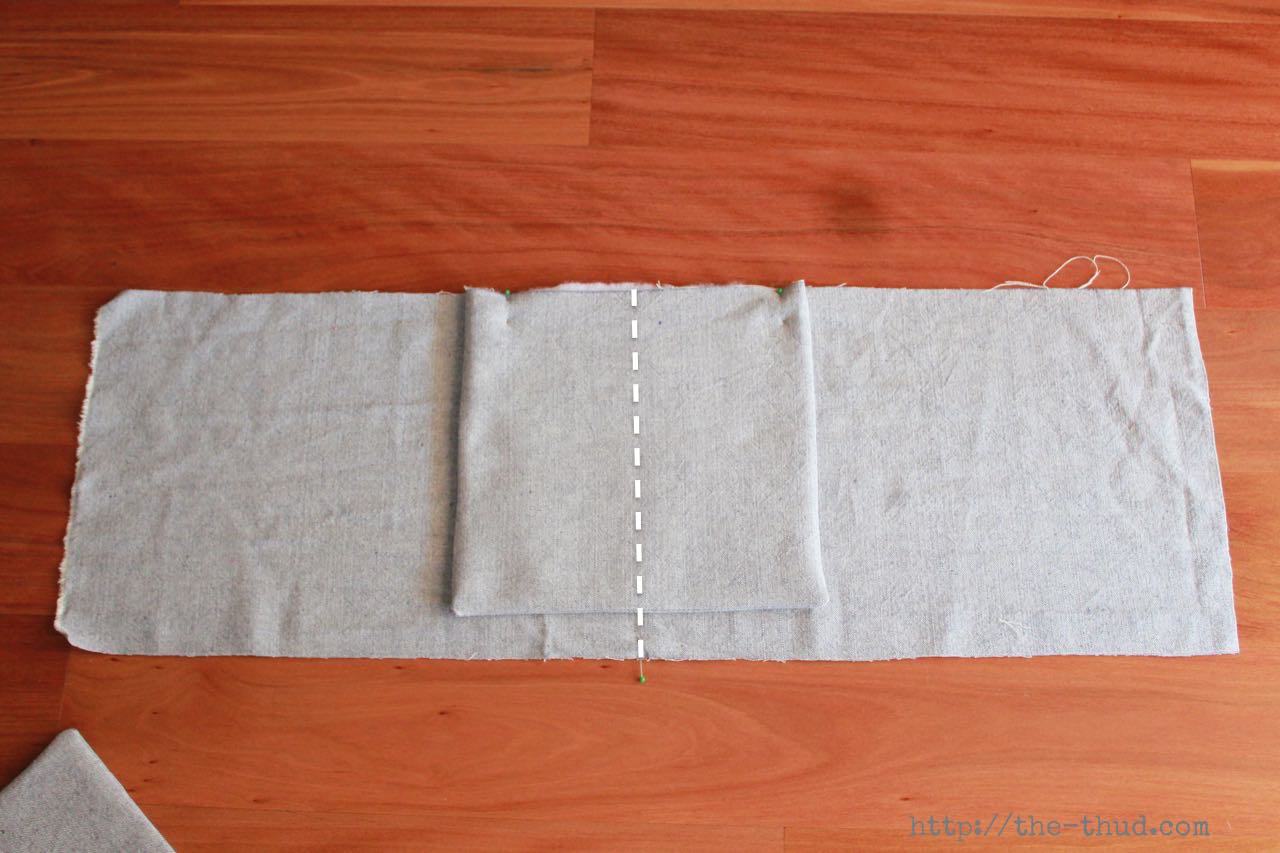
Do the same on the other side with the front section.

Then pin the other piece of fabric ON TOP of that whole thing. And then pin your batting ON TOP of all of that! So the two smaller pieces are hidden inside of all of that, right? It’s quite a bundle.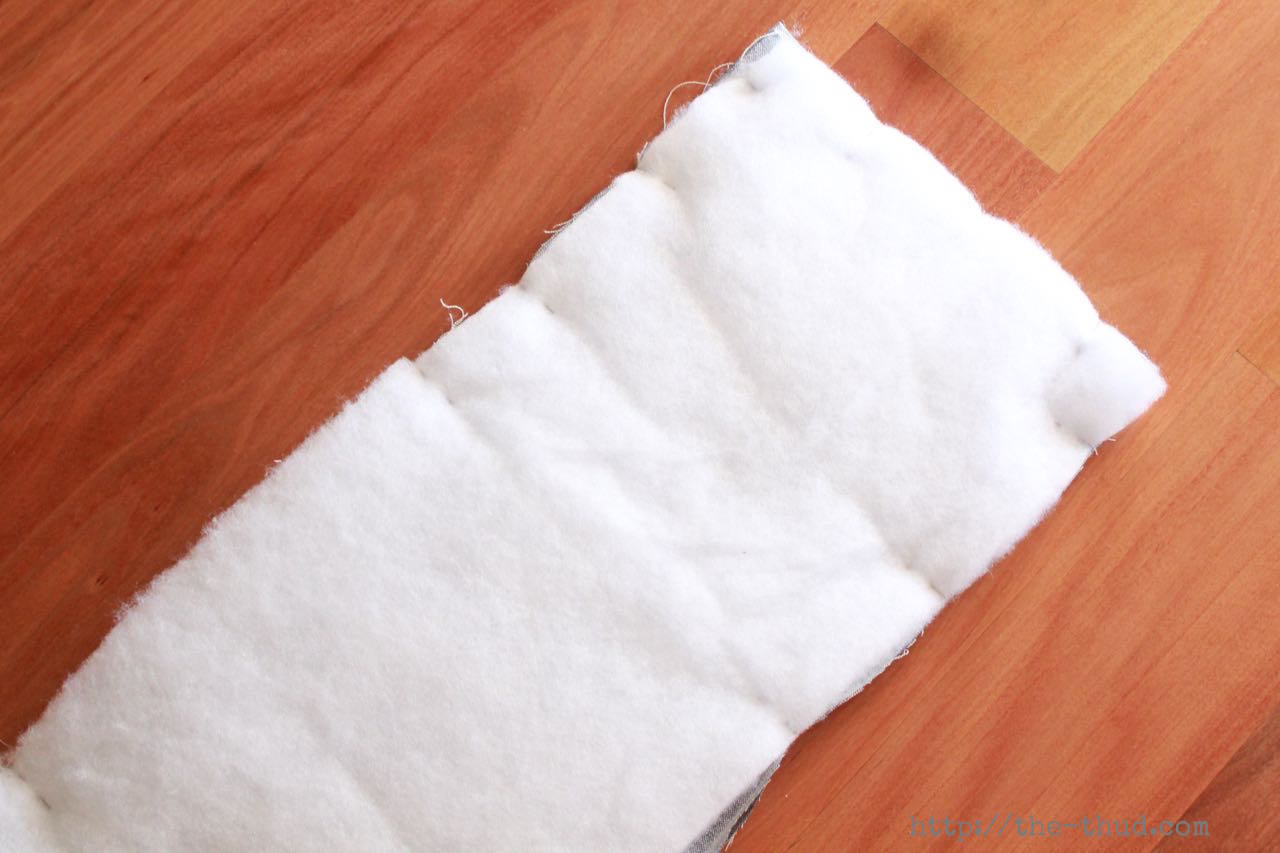
![]()
Sew around three edges (two long edges and one short edge), turn inside out/right side in and iron the whole thing flat.
Finish the fourth edge by turning the raw edges in, pinning and giving it bit of an iron.
Overstitch the open edge closed and then continue around the whole seat section to reinforce the strength.
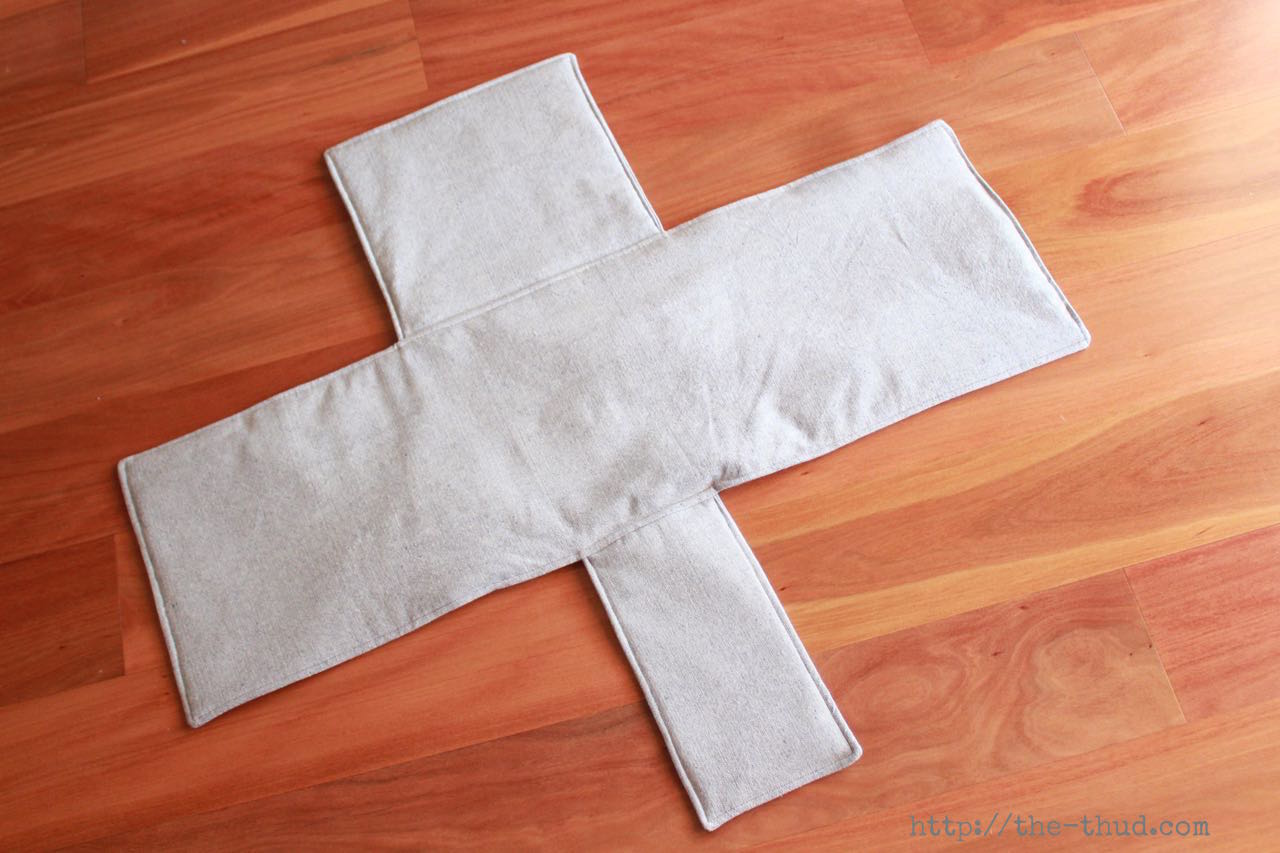
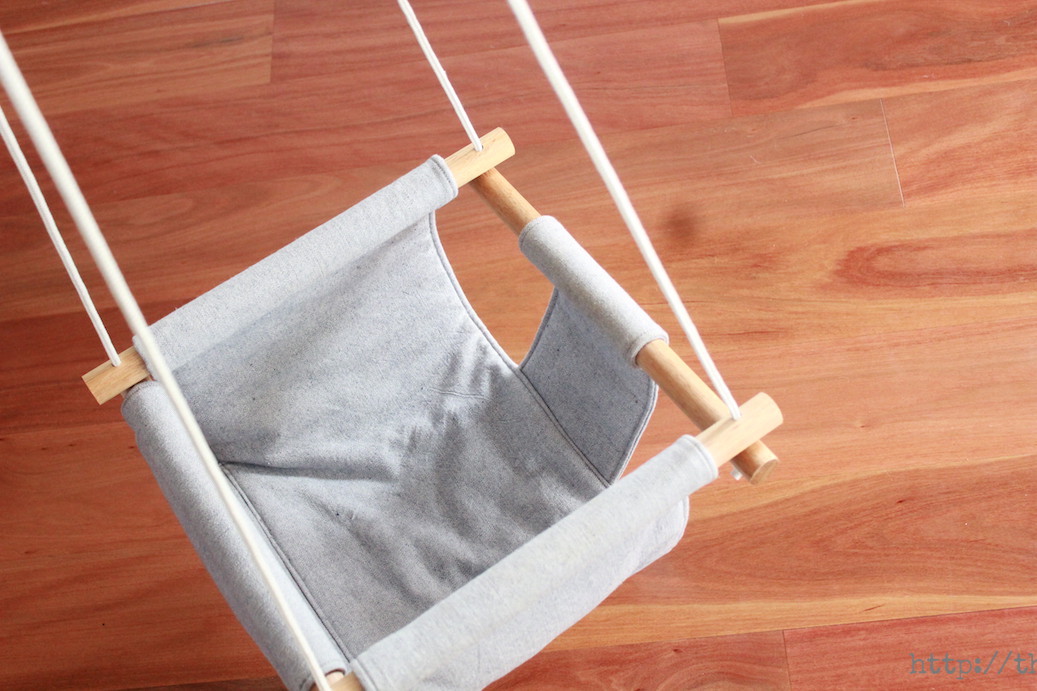
 Ta da! You have your seat!
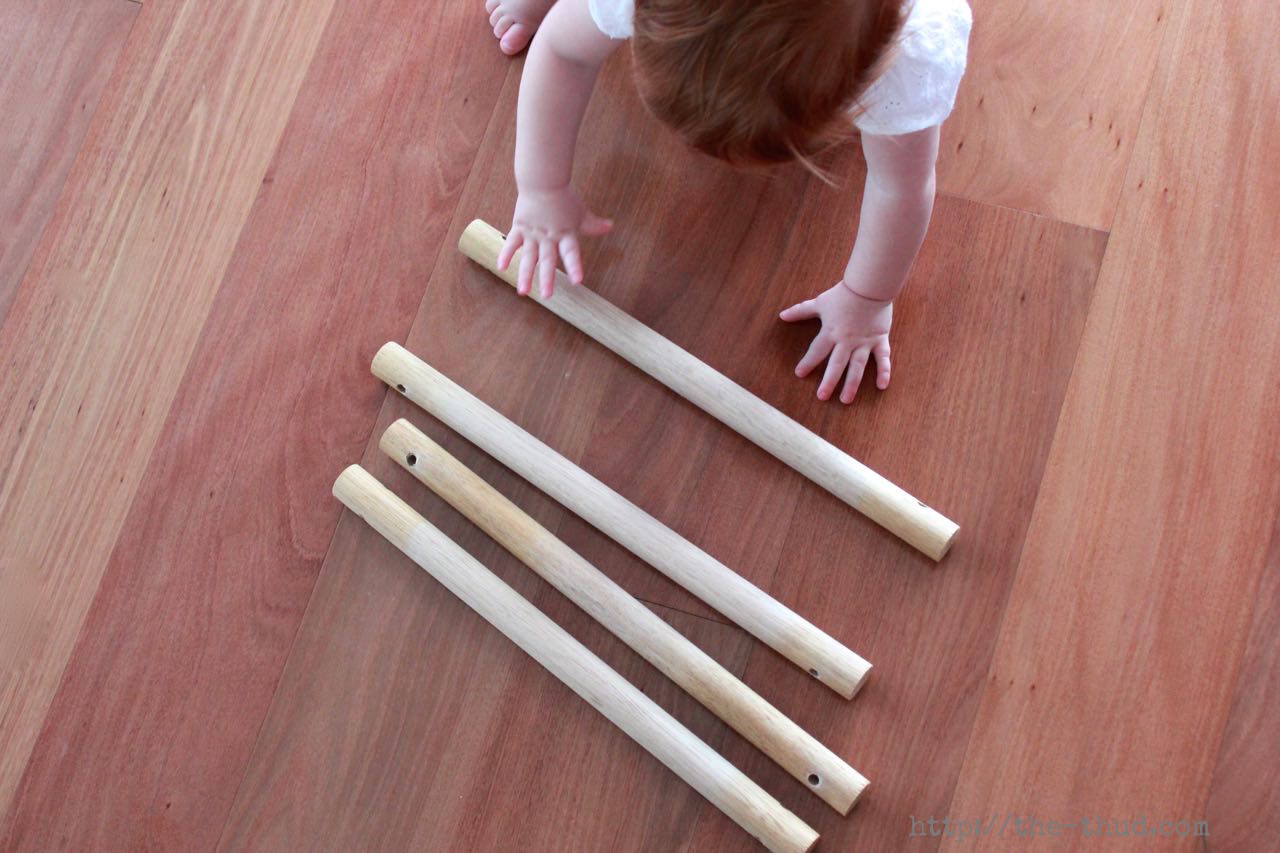
Get a responsible adult to cut your dowel into four pieces measuring 40cm each. Do not allow your toddler to do this.
Also drill holes into the end of each rod, about 4cm in from the end. It’ll need to be thick enough to thread your rope through. A 3/8 drill bit should do the trick. (Did I just sound like I knew what I was talking about? Because I don’t. Because I’m not allowed to touch the drill. I mean, I can create humans but apparently I can’t be trusted with the man’s drill. I’m not bitter about this.)
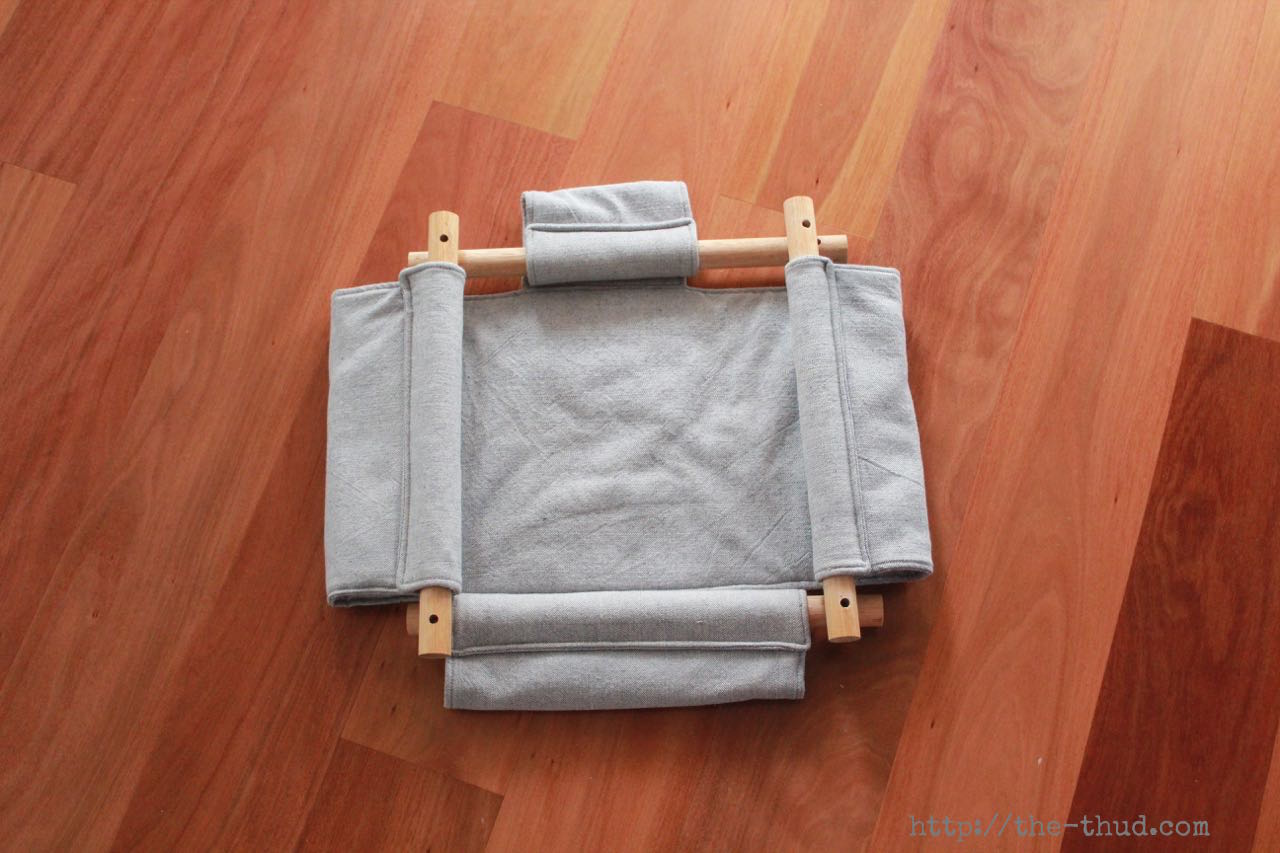
Wrap the seat edges over the top of the dowel and pin in place.
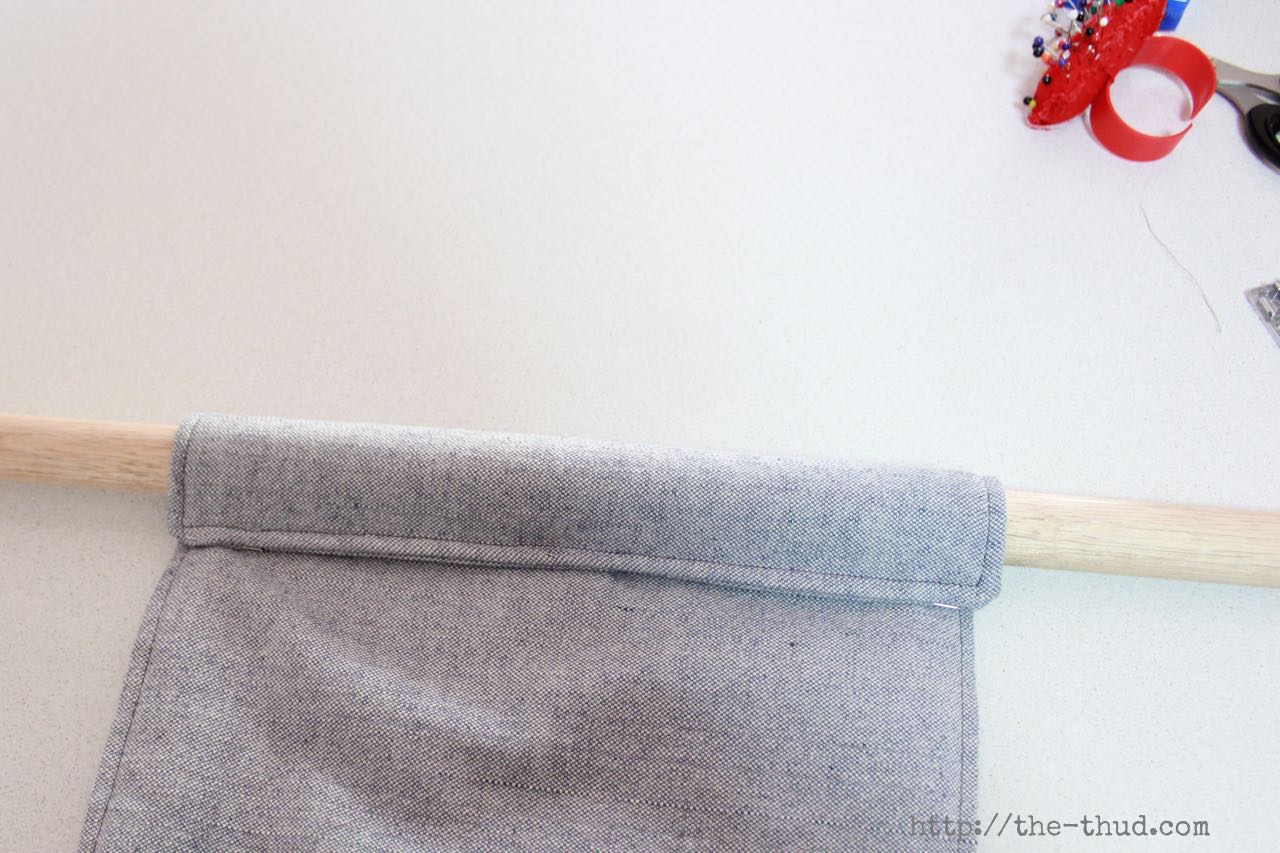
Once the pins are in place, remove the dowel so you can sew. You’ll need to use a heavy duty needle for this because you’re sewing through four layers of sturdy fabric and two layers of bunting – a snapped needle will really piss you off.
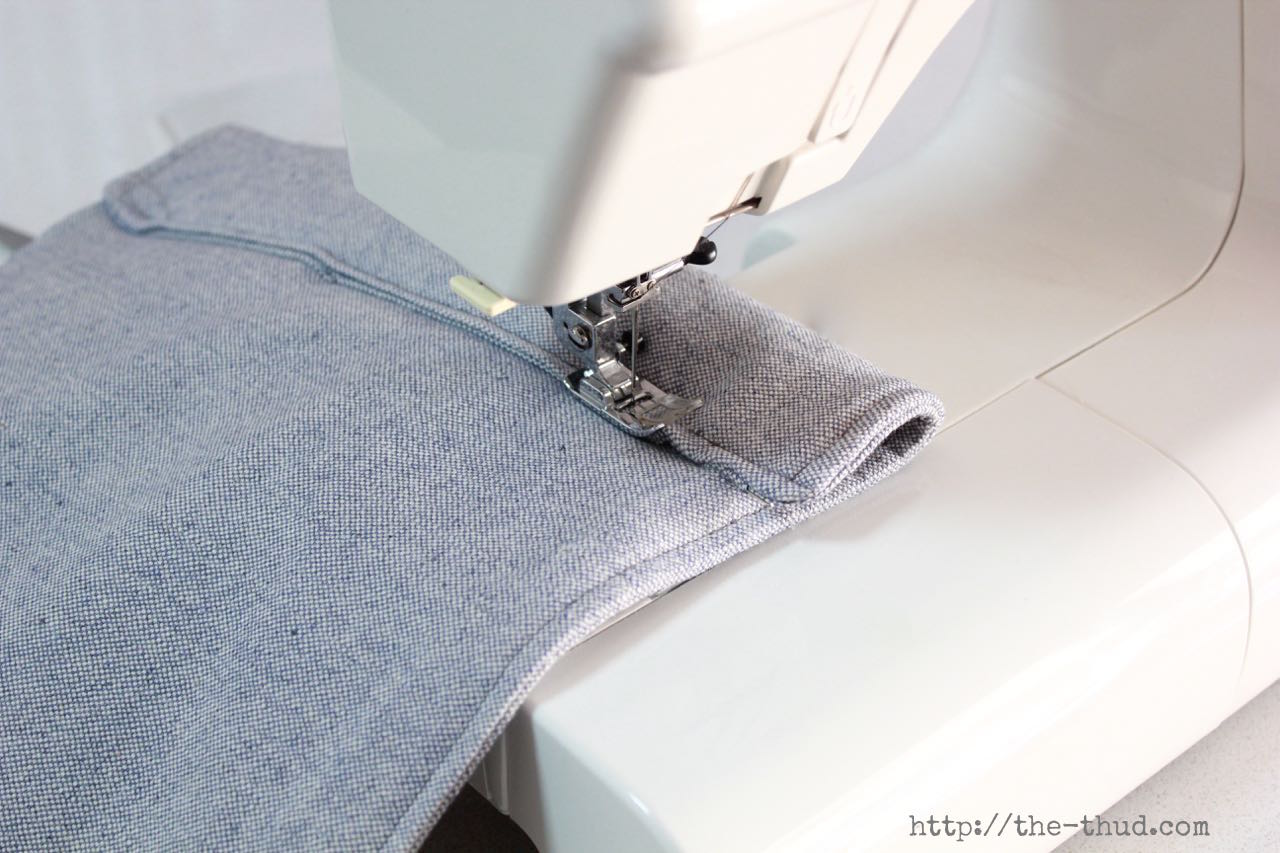
![]() Once you’ve sewn the pockets for the dowel, thread the dowel back in again.
Once you’ve sewn the pockets for the dowel, thread the dowel back in again.
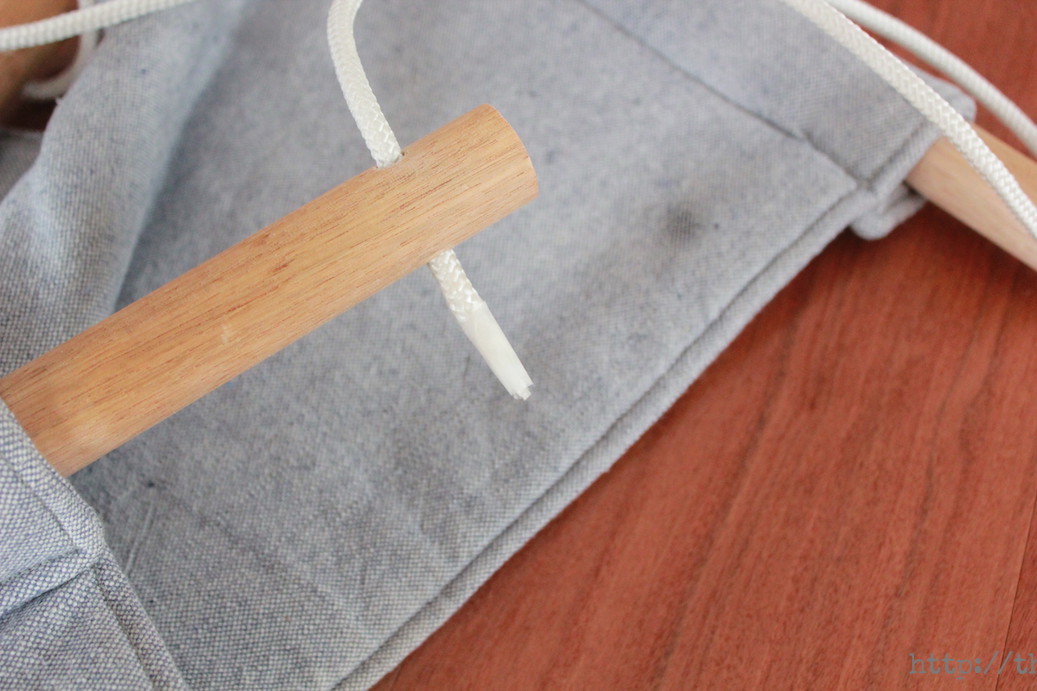
Line up the holes on the dowel so you can thread through the rope.
![]() Cut two lengths of rope. You’ll want each piece to be double the length you’d like it to hang from the hooks. Fold your rope in half and thread through your carabiners. I fastened a thick zip tie around the folded bit to keep it in place.
Cut two lengths of rope. You’ll want each piece to be double the length you’d like it to hang from the hooks. Fold your rope in half and thread through your carabiners. I fastened a thick zip tie around the folded bit to keep it in place.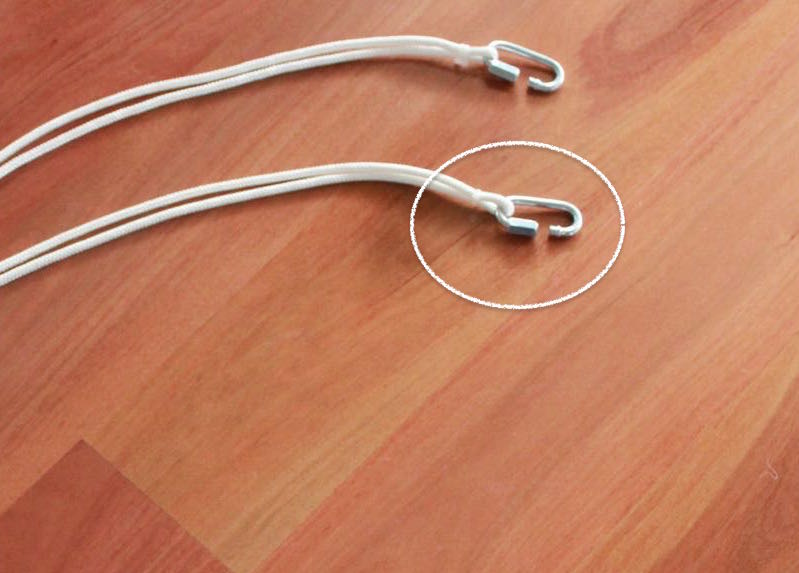
Expert tip: babies are not helpful in this process
A bit of tape around the end of the rope will help you thread it through without want to set fire to the whole thing and never speak of it again.
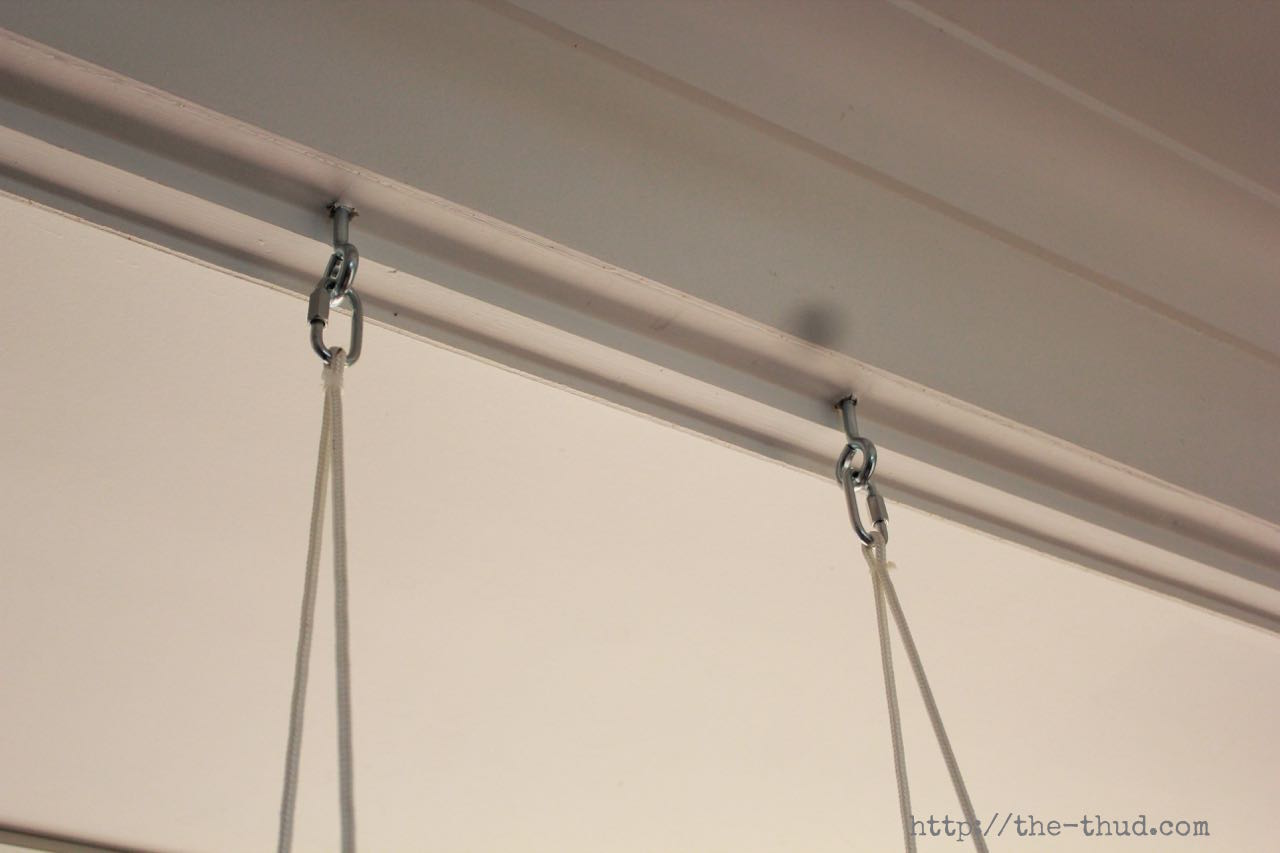
Tie a knot to secure the rope in place. Sarge decided to dip the knots in araldite glue to make sure they’d never come undone. I’ll admit it was a good idea.
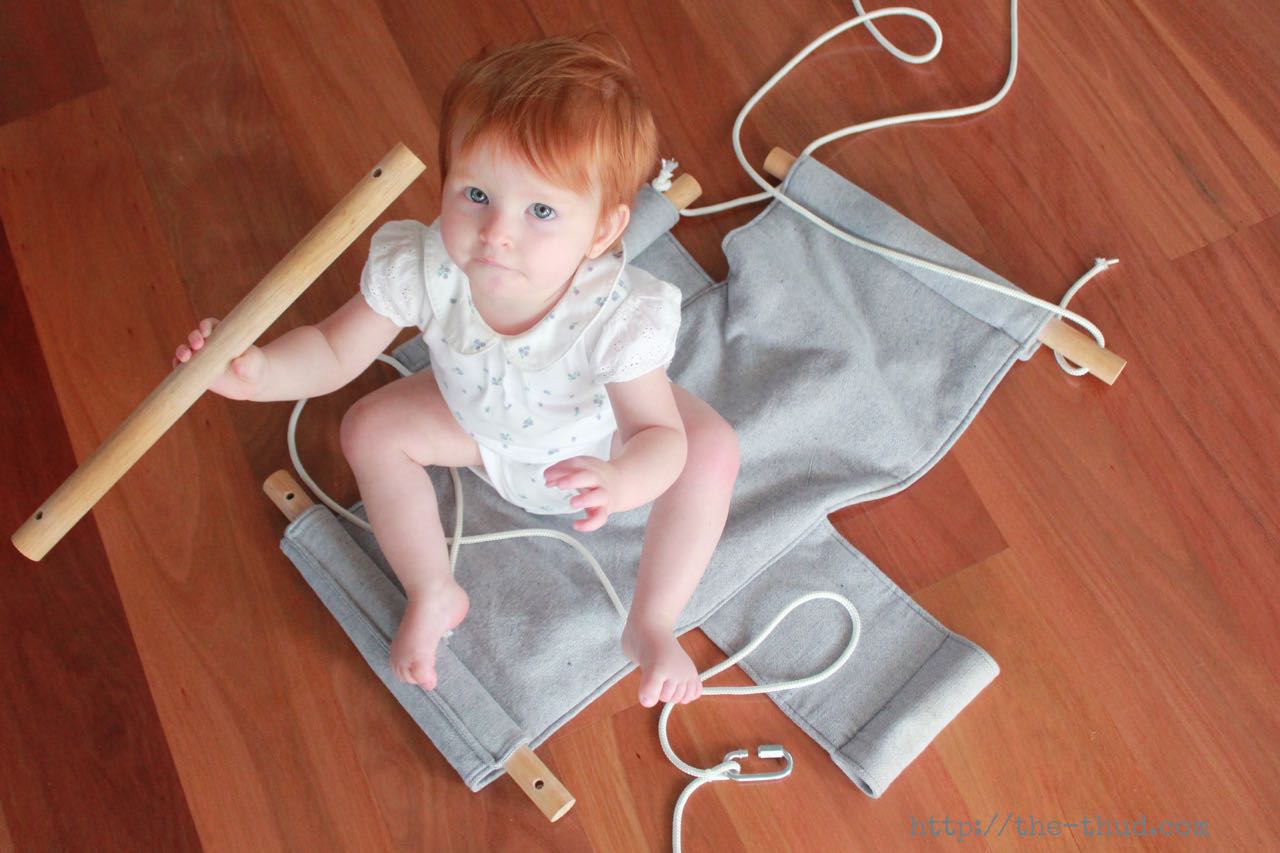
![]() Hook up your swing to the eye screws and you’re good to go! Not you, I mean. You probably shouldn’t get in the swing. I mean, the hooks and rope will hold you but that poor fabric won’t.
Hook up your swing to the eye screws and you’re good to go! Not you, I mean. You probably shouldn’t get in the swing. I mean, the hooks and rope will hold you but that poor fabric won’t.
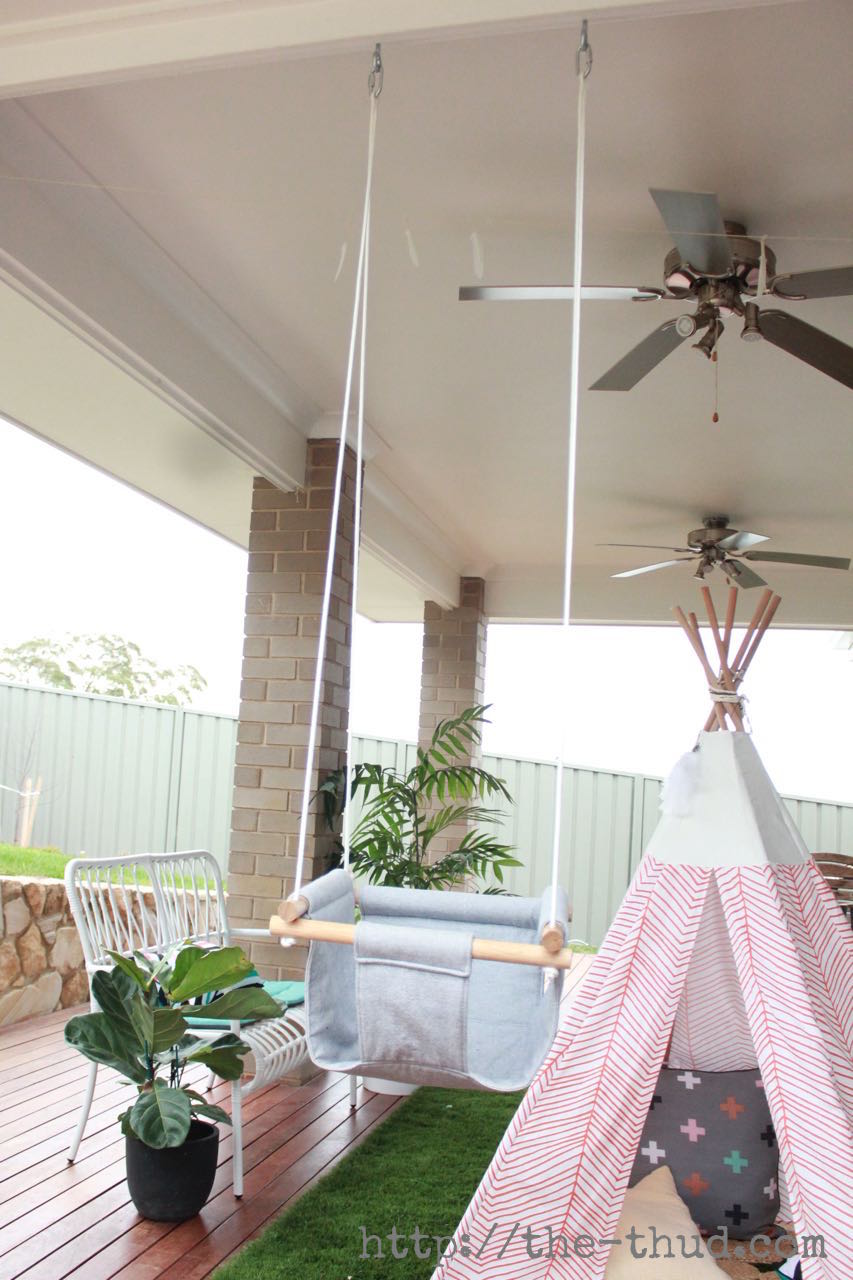
Gratuitous styling designed to subtly show my DIY Teepee
Feel free to put a child in your swing. Do you trust your skills? I mean, this is a child’s life in your hands here… Jokes! Except not really. Maybe put your less favourite child in first to give it a test run.

Can not guarantee your child will like the swing. Sorry
Or maybe they will. It’s a gamble.
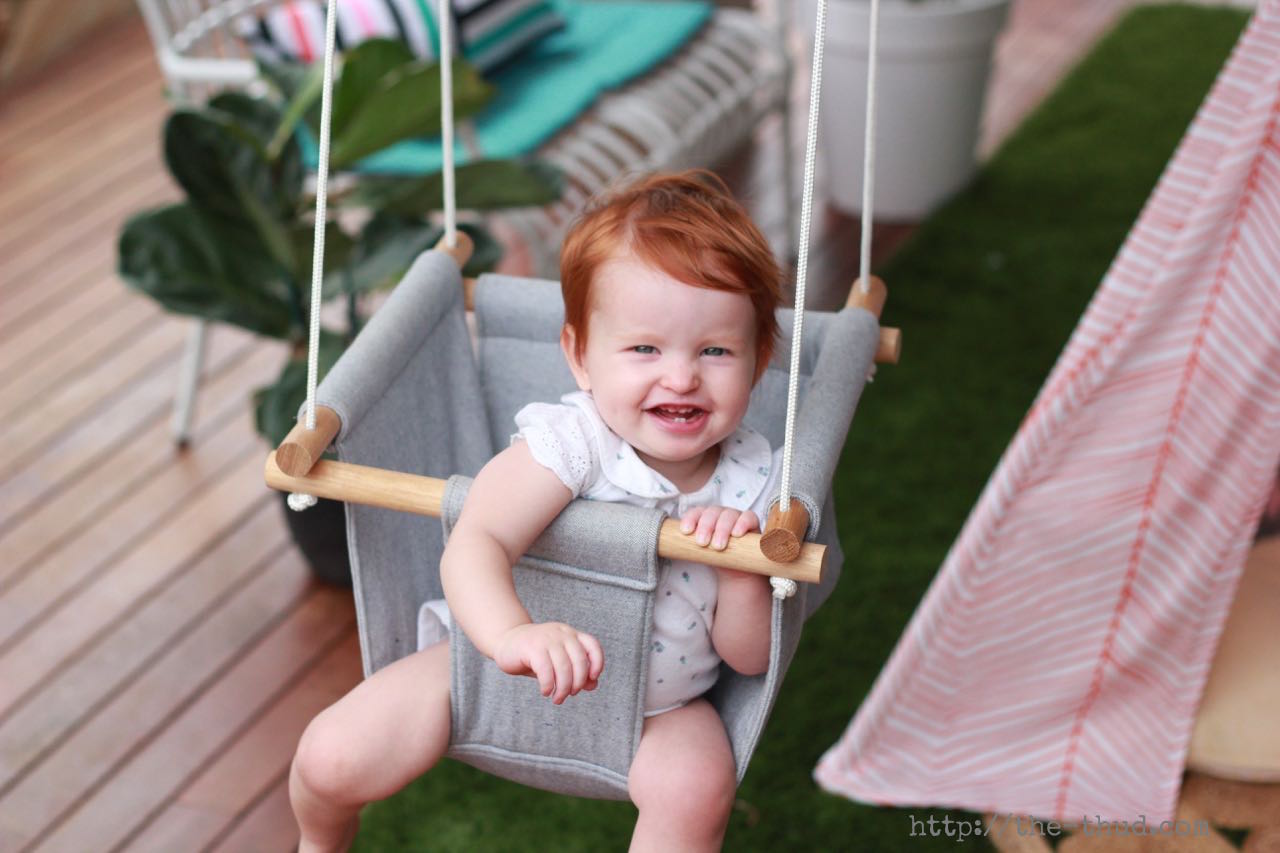

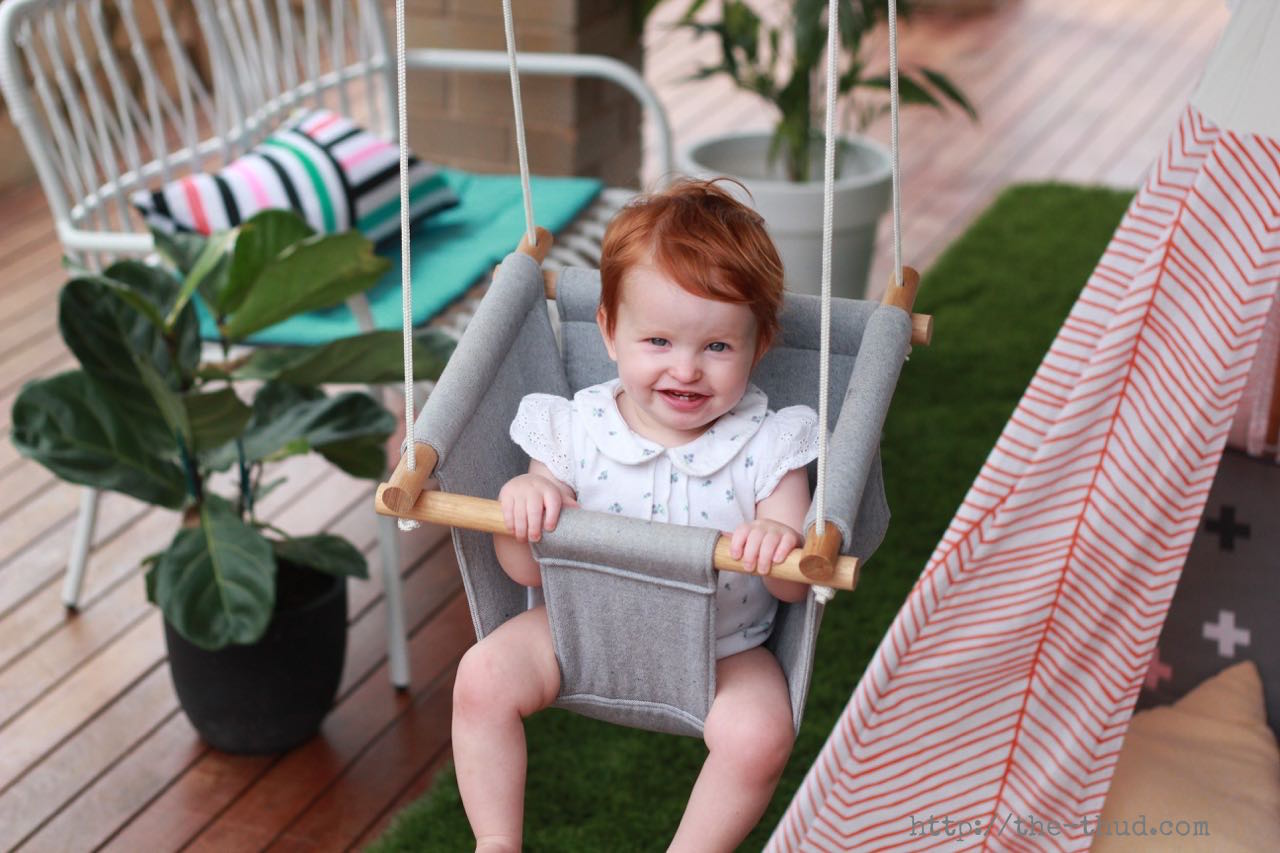
DIY Baby Swing
So go forth and swing my friends, and let me know how you go!
Follow The Thud on Facebook and Instagram


22 comments
Made this today – so happy with the end result.
This is for my granddaughter for Christmas.
She has hip displcia & is currently in a brace – think it will be ideal for her as it is roomy enough to facilitate her brace.
Thank you for sharing your skills – just love it.
Patron de la balançoire bébé et le tipi.
Thanks for such clear instructions on a great project. My husband and I joined forces and made one that could be hung from a collapsible frame so that our daughter (expecting in August) can use it next summer and set it up on her back deck, take it camping, bring it to our house, etc…… I also added text to the top of the frame……..”There is no better view than the view from a swing!”. (I wish I could attach pics for you to see!) It turned out absolutely beautiful and I can’t wait to give it to her! Thanks so much for sharing!
Hi Lauren,
It’s really nice idea for creating a mini-park in my own backyard. In your article, you told that “I’m not an expert” I cannot agree with this word. You made a baby swing nicely and it’s really awesome.
I believe that you are a super expert and skilled person.
I bookmarked this page for the future. Thank you so much for sharing such a nice idea.
Great tutorial… cannot believe that I have done it… and I even got to use the drill…
[…] belt too… also Tim got pine dowelling and nylon rope from Bunnings. We based our swing on this one on a blog the Thud… I think that Kelly had found it through Pinterest? I think? anyway I […]
[…] de «The Thud«: es uno de los mas completos. Como ella misma dice, son instrucciones a prueba de idiotas o […]
Hi Laure. Great tutorial, really easy to follow and have a bit of a laugh along the way. My daughter LOVES this swing!! I was wondering, how much weight can it hold? I have some friends wanting me to make some for their babies, but I’m just curious. Thanks!
So many laughs in this post. Can’t wait to make it for my little one for Christmas. Thanks so much for sharing
Muchas gracias por compartir. Thanks for sharing😊
Besos desde Argentina
Maggie y baby Gonzalo
I’m working away at your instructions and I’m excited about my swing. I’ve just finished step 5 and I realize that you missed a small step.
*You need to top stitch the two small pieces before attaching them to the large seat section.
Not a big deal but the finished results are better if that step is not missed.
Thank you and I can’t wait to finish it!
I just top stitched the entire thing at once, once they were all sewn together. I didn’t even realise her instructions were only to top stitch the seat part til I came back and re-read it 😛
Thanks so much for the tutorial!!! One thing I do wish is it said 1 m needed not 2 because I could have saved some money. My dad looked at me like I was crazy with 2 m of fabric for our swing lol! Really nice though ♡♡
I am so excited to do this! Also- amazing tutorial. Haven’t laughed that hard at a post in a long time! Keep em’ comin!
[…] that we’re going to do our best attempt we’re going to try you know that we’re DIY liars, and we like to do things ourselves hate to steal your […]
Hello, Thank you very much for the tutorial, i am planning on creating a swing for my 1 year old nefew, but I was wondering, what is the maximum weight that the toddler swing could carry. Mr E. is already 30 pound…
Again thant you for the good laugh I had reading this and the awesomeness of the project
Have a nice day
Thank you thank you thank you so much for this post. I’ve been having bitter arguments with family and friends about not having a swing. They just don’t get it. Aside from many other reasons (guilt for having a registry and asking others to buy me things, party full of girls, center of attention), I just don’t want people to buy me things because I know I’ll end up with way more than I need. And by need I mean require, not would be nice. Of course, there’s always the comment, “Oh ok, well you’ll see!” as in I’m wrong and I need to get with it. I think, that’s right, I will wait and see. No need to start filling up an entire room plus the rest of the house with stuff I and the baby don’t want and probably don’t need.
Thanks Lauren for such a helpful article. I was thinking to make my own swing for my little one. I hope your instructions will work for me.
Dear Lauren,
thank you so much for this great tutorial. I mean, I’m not a native speaker but I think it is the first time in my whole life that I prefer a tutorial in another language. There was this other one in my mother tongue, but I really don’t understand what she’s talking about…
Your tutorial is funny and well explained.
Hope my little boy loves his new swing. I do.
Have wonderful eastern holidays,
Doris
Awesome tutorial!!! I can’t wait to make it!!
brilliant, just made one ourselves thanks so much
Dear Lauren,
Thanks for the DIY Baby swing. I am a Grandad and can turn my hand to most things. In my late twenties I lived in a shared house and a new young man in his early twenties arrived with his hang glider, motorbike and sewing machine. He made all his own clothes! I had played around a little with my mothers old singer which must be from the 1940s so I decided that, if he could do it so could I!
I did make quite a few jackets, shirts and trousers over the next few years. I have only made a few things since. I decided to make the baby swing ( yes still using my dear mum’s old 1940s singer!) for my now three month old grandson for Christmas as we had made one for my daughter when she was a baby.
Since I have not sewn anything for some years now I was following your instructions to the letter! When sewing the seat and back, I did exactly what you said… sew 3 of the 4 sides together. I did wonder if it mattered which side I left open but failed to look and think ahead!!! Having sewn 3 of the 4 sides together I now realise that I should have left the 30.5cm edge open on the back otherwise I will not stitch up the open side when I join the front, back and seat together!
My mistake, for not looking and thinking ahead but just thought I’d tell you what I had done in case you wanted to add a little note for ‘Literal’ Newbies like me. Easily fixed with a visit to Spotlight to get an unpicker!
Thanks again for the instructions – I better get back to it or it won’t be finished for Christmas.
Have a wonderful Festive season!
Wayne.